Hey fellow crafters,
I promised this one last issue. And I'll be honest — it took longer to write than expected because I kept second-guessing how much to include.
Bubbles are the single most common frustration you told me about. I get it. You warmed the resin, mixed slowly, waited before pouring. And you still opened the mold to find a surface full of tiny craters. It's the kind of result that makes you want to blame the brand, blame the weather, blame anything except the one thing you can actually fix.
This issue is about that one thing.
Today's Lineup:

1. This Week's Insight:
You did everything right. So why are there still bubbles?

Most of the advice you'll find online focuses on what to do during and after the pour. Torch the surface. Use a heat gun. Pop them before they cure. Some of that helps. But the bubbles that end up locked in your finished piece - the ones a torch can't touch - those were introduced earlier.
The mistakes that produce stubborn, cured-in bubbles happen before the pour, not during it. Want the full breakdown? Continue reading below - here's the short version:
Article summary:
Seal the wood first, every time. Wood pores release trapped air when epoxy is applied. A thin sealing coat before the main pour closes those pores. Skip it and you're pouring over an air-release mechanism. I learned this the hard way.
Warm your resin before mixing. Cold resin holds more dissolved gas and releases it more slowly. A 5-minute warm water bath on both components - not a heat gun, not hot water - reduces viscosity and lets bubbles escape before you pour.
Slow mixing, not just gentle pouring. Stirring too fast whips air in like beating eggs. Slow and deliberate from the base up, for at least two full minutes. Silicone tools create less turbulence than wood sticks.
Let the mixed resin rest. 5-10 minutes after mixing lets surface bubbles rise and pop on their own before you touch the mold. Easy step, often skipped.
Pour low and slow. The longer the stream falls, the more air it picks up. Keep the pour close to the surface. Think pouring syrup, not water.
Vacuum chamber if you mean it. Nothing else comes close for casting work. Even a basic unit pulls out air that no heat gun will reach. Worth the investment if bubbles are your recurring problem.
Bubbles appearing in waves after the pour = substrate issue. Not fixable with heat. The surface below is releasing air.
Repairs rarely work 100%. Especially on transparent or multicoloured castings. Drill, fill, sand - it's possible, but it's extra work with no guarantee. Prepare twice, cast once.
My take: Two things made the real difference across my projects. First - seal the surface, always. A lot of YouTube guides skip this step, and sometimes it works out. But when it doesn't, it ruins the entire cast. Not worth the risk. Second - do everything you can to have as few bubbles as possible in the mixture before it ever touches the mold. Whether that's warming the resin, letting it settle, or vacuum degassing - pick your method and commit to it. Bubbles you remove before the pour can't come back. Bubbles you miss will be there forever.
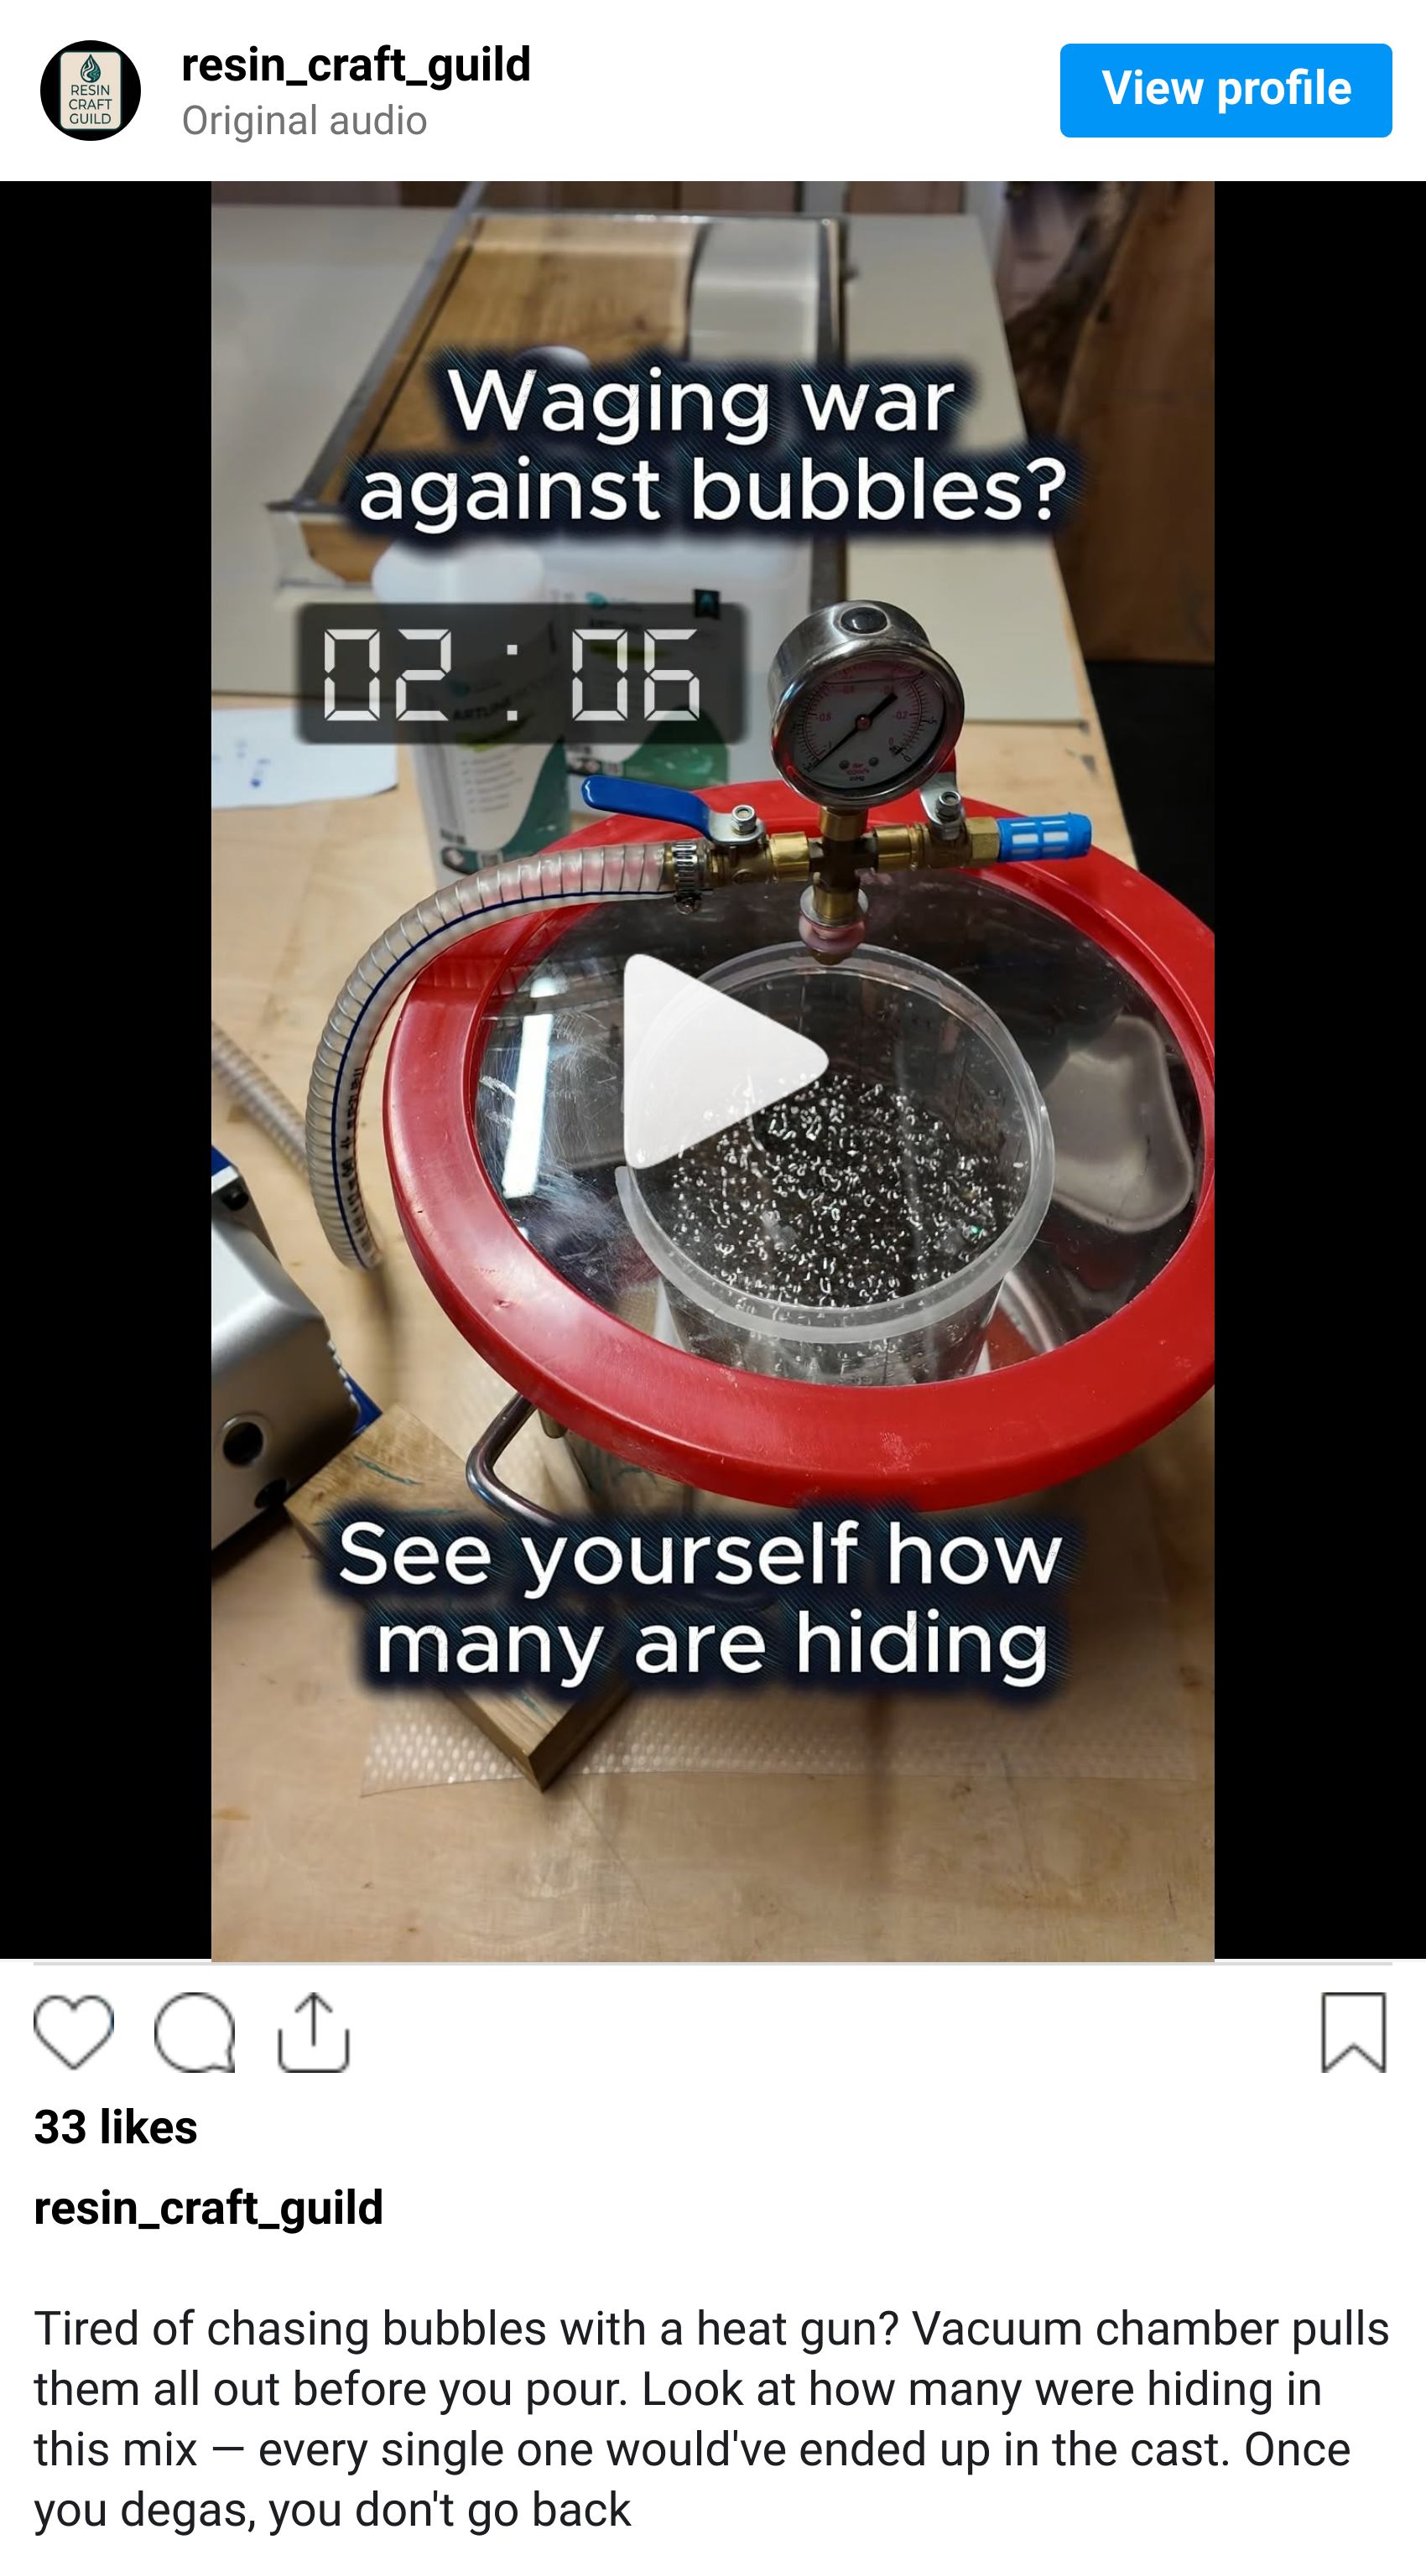
Bubbles in action
I recently filmed the vacuum chamber in action - 20 minutes of degassing, start to finish. The amount of air that comes out of freshly mixed resin is something you have to see to believe. Worth watching before you decide whether a chamber belongs in your workshop.
📖 Continue reading: The Woodworker's Guide to Removing Bubbles in Epoxy Casting – 2026 Update
2. Project Inspiration:
Ado Chale's Black Resin & Malachite Coffee Table
When I started researching the malachite + walnut set, I wasn't looking for design references. I was looking for technique. But I ended up finding something better: a maker who'd been doing this since 1975, at a level that stops you in your tracks.
Ado Chale. Belgian. Born 1928. Self-taught craftsman, trained blacksmith, accidental mineralogist - and the person who figured out, decades before anyone in the maker world was talking about it, that epoxy resin and semi-precious stone belong together.

Ado Chale black resin coffee table with malachite inlay, c. 1975
Ado Chale's Black Resin & Malachite Coffee Table (c. 1975)
The piece that stopped me: a rectangular coffee table, black resin field, one side inlaid with crushed malachite in a dense banded mosaic. Lacquered steel base. The contrast between the flat black surface and that concentrated strip of deep green is what makes it work - the stone reads almost like it's lit from underneath even in photographs.
What Chale understood is that resin isn't a coating - it's a matrix. The stone lives inside it. The surface you sand to isn't a finish on top; it's the same material the stone is suspended in, polished until they're flush. That's a different mindset from how most makers approach this, and the results show it.
His clientele was not modest: the Belgian royal family, Chanel, Dior, Hermès. The craft discipline that made that possible shows in every surface - no shortcuts in a piece built to outlast you.
Designer's perspective:
Chale almost always concentrated the inlay on one zone of the surface, not spread evenly across it. That's deliberate - concentration creates contrast, and contrast is what makes the stone readable from across a room. One strong zone beats a decorated field every time. That principle is directly shaping the malachite set I'm working on now.
Worth looking up: his illuminated tables, where he built lighting systems underneath the resin-and-stone tops. Pioneer territory, from the 1970s. Start at adochale.com - and the specific 1stDibs piece that inspired this section is worth a look on its own.
3. Materials & Tools Spotlight:
Vacuum Chambers - When You Actually Need One
When I first started getting serious about bubble-free results, I convinced myself I needed a vacuum chamber immediately. I was wrong about the timing. But I wasn't wrong about the tool.
Here's what I wish I'd known: a vacuum chamber doesn't prevent bubbles. It removes dissolved air from your resin after mixing, before you pour. If your substrate is unsealed and your resin is cold, the vacuum chamber is fighting a losing battle against a problem that should have been solved upstream. Fix the basics first.
That said - once you have your process dialled in, a chamber is the single biggest upgrade available for anyone doing casting work where bubbles are visible in the finished piece. No technique, timing trick, or product switch comes close to what pulling resin under vacuum does for clarity.
What to look for:
Chamber volume: for most workshop casting, a 2–5 gallon (7,5–19 liter) capacity handles standard pours without running multiple batches
CFM rating on the pump: higher CFM pulls deeper vacuum faster - relevant for thicker resins that release air slowly
Gauge: analog is fine; a two-stage pump with a gauge you can read during the process is enough
The brands I've tested and verified as fit for purpose are in the guide below. Mid-range options in the $150–250 range (pump + chamber combo) do the job for the majority of workshop use cases. You don't need a lab-grade setup.
Bottom line: if you're doing surface coating or thin pours, you don't need this yet. If you're casting anything with visible depth - river table sections, clear inclusions, deep jewelry molds - a vacuum chamber is eventually where your results top out without it.
Affiliate link: Vacuum Chamber Kit - tested setup I use - disclosure: affiliate link, small commission at no cost to you
4. Quick Win of the Week:
Pour height introduces more bubbles than you think
The higher your resin stream falls, the more air it picks up on the way down. Most people focus on how fast they pour - the height matters just as much.
Pour from as close to the surface as possible, a few centimetres at most. As the mold fills, lower the container with it. A long thin stream falling from above the mold can introduce more bubbles than a poor mix. Simple fix, zero extra time.
I forget this one more often than I should.

5. Save with the Guild
A couple of deals from partners where you can save on tools and materials.
Artline Resin - EU-based brand covering the full range from jewelry and thin castings to deep pour wood projects. Resin is food-safe. Free shipping across the EU from €150, and resin orders come with two pigments included.
Click the link or use code ResinCraftGuild for 10% off your entire order.
Currently on my workbench - review coming, but you can see it in action in my recent IG reels.
Craft Resin - crystal-clear, non-toxic, low odor. Works for arts and crafts, tabletop coating, and deep pour. Self-leveling with a straightforward mix ratio - good starting point for beginners.
Click the link or use code RESINCRAFTGUILD_10 for 10% off your entire order (one use per customer).
Resiners - the brand behind the vacuum degassing machines I cover in the bubble guide. Their shop goes well beyond that - you can find bubble and curing machines, epoxy resin, mica and color powders, silicone molds, craft accessories, and starter kits. Worth a browse if you're stocking up.
Click the link or use code ResinCraftGuild15 for 15% off your entire order.
Affiliate disclosure: Some links in this newsletter are affiliate links. If you purchase through them, I may earn a small commission at no extra cost to you.
6. Shape the Guild - Feeling stuck with your project?
I'm considering offering 30-minute project calls for people who are stuck - a focused session where we diagnose your specific problem and figure out the fix together. Before I set anything up, I want to know if there's a real need for it.
If you have a specific epoxy or woodworking problem you'd pay a small fee to solve in a single session, reply to this email with what it is. Something like "I have a walnut slab and can't figure out the pour sequence", "I don't know which resin to choose for my project and the product pages all say the same thing", or "I can't figure out how to sand epoxy to a high gloss finish" is exactly what I'm looking for. That kind of reply tells me whether this is worth building.
Now that we've covered bubble prevention, next week we're moving into colour. Pigments, inks, powders - how to mix them without ruining the cure, how to get consistent results, and what to avoid. More to come.
Next RCG issue: Resin colouring - powders, pigments, inks, and how to not ruin your project.
Petr
Resin Craft Guild
www.resincraftguild.com
P.S. The malachite inlay project is in progress. I'll document each piece properly - the techniques involved are different enough that each earns its own issue. Check the current status on my Instagram.

Stay tuned…