By Petr Šulek — Resin Craft Guild
Hey fellow crafters,
There was a point where I was spending more time testing colors than actually making things. Learning how to color epoxy resin properly — not just what to add, but why it works — was the thing that changed this.
Color testing isn't just about the shade you see in the cup. The colorant type matters, and the final result is always the resin color read against the wood. The wood species is part of the equation — make sure your tests reflect that. I never had a fully failed pour because of color, but I've had projects where the contrast went nowhere near what I planned. The flip side: far more came out better than expected. That's the nature of resin — and those surprises are worth chasing.
Today's Lineup:

1. Why Coloring Epoxy Resin Goes Wrong Before You Add a Drop of Pigment
The mistake isn't usually the pigment. It's using a colorant that isn't compatible with resins, and most beginner tutorials don't even mention this exists as a problem.
Epoxy resin is a reactive system. When you add something to it, that something interacts with the chemistry. Oil-based colorants (like some candle dyes, oil paints) or certain alcohol inks don't fully incorporate — they sit in suspension and can migrate as the resin cures, leaving streaks, separation, or a surface that never fully hardens. Water-based colorants introduce moisture, which can cause cloudiness or surface tackiness. Even some "resin-safe" pigments sold cheaply online have fillers that interfere with the cure.
Before you choose any colorant, know your resin's compatibility. Most reputable epoxy manufacturers publish this — and if you're still selecting a resin, the RCG epoxy resin brands guide covers compatibility differences across the most common systems. If yours doesn't publish compatibility data, test with a small batch before committing to a full pour.
The most common reason beginners get muddy, separated, or uncured color in their resin isn't bad technique — it's incompatible colorant. Check compatibility before anything else. A test tile takes 10 minutes and saves a full pour.
2. The Four Main Colorant Types — What They Actually Do
Understanding what each colorant type is made of tells you exactly what to expect from it.
Pigment pastes (resin-specific)
Pre-dispersed pigment in a resin-compatible carrier. These are the most reliable option for consistent, opaque color. They're already formulated to mix cleanly into epoxy without interfering with the cure. The color you see in the paste is very close to the color you get in the finished piece — less guesswork. I use these for most functional pieces where I need a specific, repeatable color. Limitation: you can't achieve true transparency with a paste.
Mica powders
Finely milled mineral powders that reflect light rather than absorbing it. This gives that metallic, pearlescent shimmer that's become the signature of a lot of modern resin work. Unlike pastes, micas don't dissolve into the resin — they stay as particles that catch light. That means they can also settle if you use low quality powder. Best for shallow pours — though with a quality product I've never had settling issues even in deeper pours. Dose carefully — too much mica and the powder starts to clump and lose its shimmer effect entirely.
Alcohol inks
Dye dissolved in isopropyl alcohol. The alcohol flashes off as the resin cures, leaving concentrated dye behind. The result is vivid, transparent color with the kind of organic cell patterns that you can't replicate with any other colorant — the alcohol and resin move against each other as they interact. Limitation: this interaction also makes alcohol inks the least predictable option. Results vary with resin brand, room temperature, and how you apply them. Beautiful when it works. Frustrating when it doesn't. Not for beginners who need a specific result.
Resin dyes (liquid)
Transparent, liquid colorants specifically formulated for resin. These give you the most controlled transparency — deep, jewel-like color that lets light pass through. Best used in thin layers where you want to show off wood grain underneath, or in river table pours where seeing the wood through the resin is the whole point. Like alcohol inks, they don't add opacity — if you want to hide something, use a paste.
My take: I started straight with mica powders because I like the results — and that worked for me. But if you're just starting out, experiment with pigment pastes for opaque work and resin dyes for transparent work first. Most suppliers offer small, cheap color samples, so the barrier to entry is low. Master those before adding alcohol inks to the mix. Predictability matters more than range when you're learning.
3. How Much Epoxy Resin Pigment to Add (and the Limit You Shouldn't Cross)
There's a loading limit for every resin, and going past it causes real problems.
For most epoxy systems, the maximum colorant load is around 5–6% by weight of the total resin volume. Past that point, you're not getting more color — you're getting interference with the chemistry. The colorant starts displacing resin components, which means your mix ratios are no longer accurate even if you measured them correctly. Result: a pour that stays sticky, or cures soft in patches.
The practical guide for each colorant type:
Pigment pastes: Start at 2–3% of total resin weight. Increase to 5–6% for very opaque coverage. Rarely need to go higher.
Mica powders: 1–3% by weight. At 4%+ the shimmer diminishes and powder starts to clump or drag during mixing.
Alcohol inks: Start with 2–3 drops per 100ml of resin and adjust from there. More drops doesn't mean more color — it means more uncontrolled migration. Add cautiously.
Liquid resin dyes: 1–3% by weight, similar to pastes but with more color-per-gram since dyes are more concentrated.
Always refer to the handling guide of your specific product — loading limits vary between resin systems and manufacturer recommendations take priority over any general rule. And weigh your colorant additions, at least until you build enough experience to judge by eye. A digital scale that reads to 0.1g changes this from guesswork to a repeatable process.
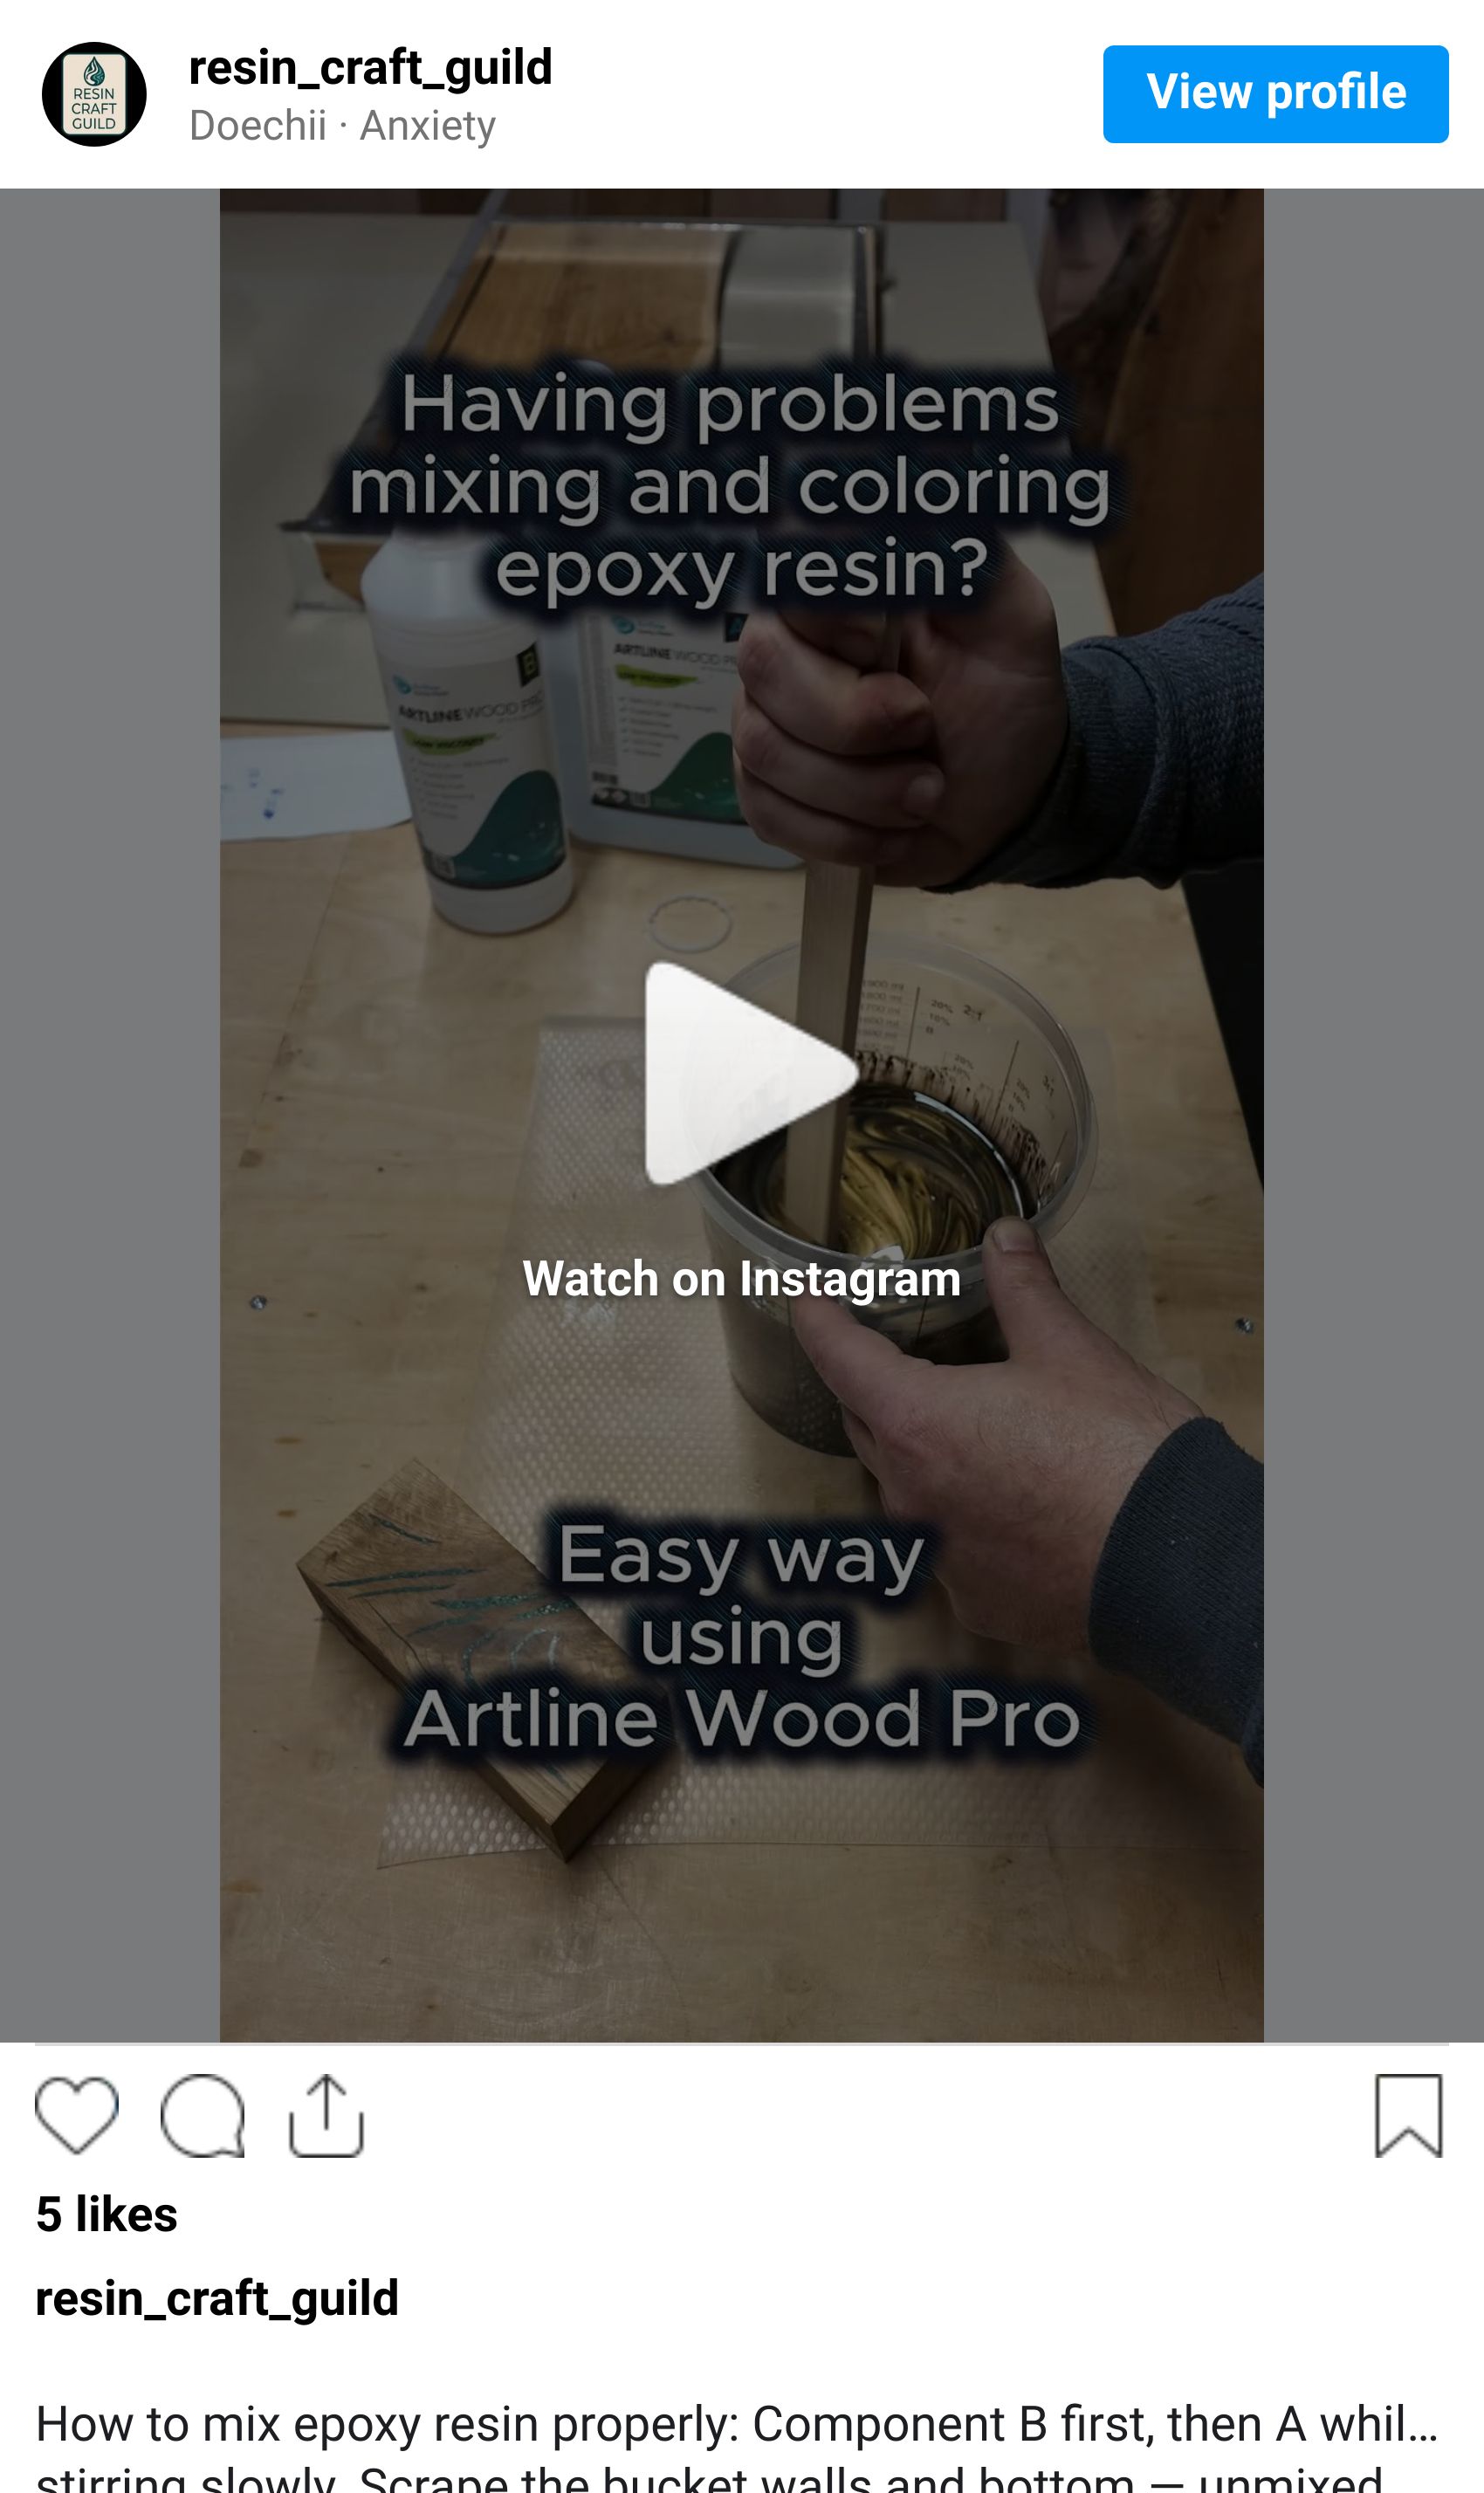
4. Mixing Technique: When and How to Add Resin Colorant
Timing matters. Adding pigment at the wrong point in your mix creates problems that look like bad pigment but are actually bad technique.
Step 1: Mix resin and hardener first Combine your Part A and Part B at the correct ratio and mix thoroughly — scrape the sides and bottom of the container — before adding any colorant. Adding pigment to unmixed resin means you're mixing the colorant into a reactive system that isn't ready yet. The pigment can mask whether Part A and Part B are actually combined.
Step 2: Add colorant to the mixed resin Once your resin is fully combined, add your colorant. Add it gradually — a small amount, mix well, check the color, then add more if needed. You can always add more pigment. You can't remove it.
Step 3: Mix until streak-free Stir slowly and thoroughly. With pigment pastes, look for complete elimination of streaks — a fully uniform color throughout. With mica, you'll see the shimmer distribute evenly. With alcohol inks, don't mix them into the cup — drop them onto the poured surface and let the interaction do the work.
I keep small cups just for color testing — mix 10ml of colored resin and pour a test tile before committing to a full batch. Cures in a few hours, but tells you exactly what the finished color will look like. Saves full pours.
The mixing and coloring process in action, I filmed a short reel showing the full sequence:
5. Layering Colors and the Transparency Trap
Layering is how you get depth — and it's where most intermediate makers run into trouble.
The common assumption: pour a transparent blue layer, let it cure, pour a transparent green layer on top, and you get a beautiful layered jewel effect. The reality: resin layers bond chemically when the previous layer is still tacky (the "sticky" cure stage — typically somewhere between 8–16 hours, but this varies significantly with resin system, ambient temperature, and pour thickness; always check your product's datasheet). If you wait for a full hard cure, new layers bond mechanically — which works but requires surface preparation between pours (scuff the surface lightly with 220 grit and wipe clean before adding the next layer). For a full walkthrough of surface prep between pours, the RCG epoxy preparation guide covers this in the mold and layering context.
For layered color effects:
Pour the first layer — usually a dark colored base.
Wait until the surface is tacky but not wet — you can press a gloved finger to it and lift without the resin pulling up.
Pour the second layer directly onto the tacky surface — this is where a transparent color adds depth over the base.
The two layers will chemically bond and the colors will remain distinct.
The transparency trap: Transparent colors look dramatically different at different depths. A 5mm layer of resin dye looks like a light tint. A 30mm layer of the same dye looks almost black. If you're designing a transparent pour, always test your color at the actual depth you're pouring. Thin test tiles don't predict deep pour color.
Here's what catches people: the color in your mixing cup is always more intense than it will be in a thin pour and less intense than it will be in a deep one. The only honest test is a tile at the actual pour depth.
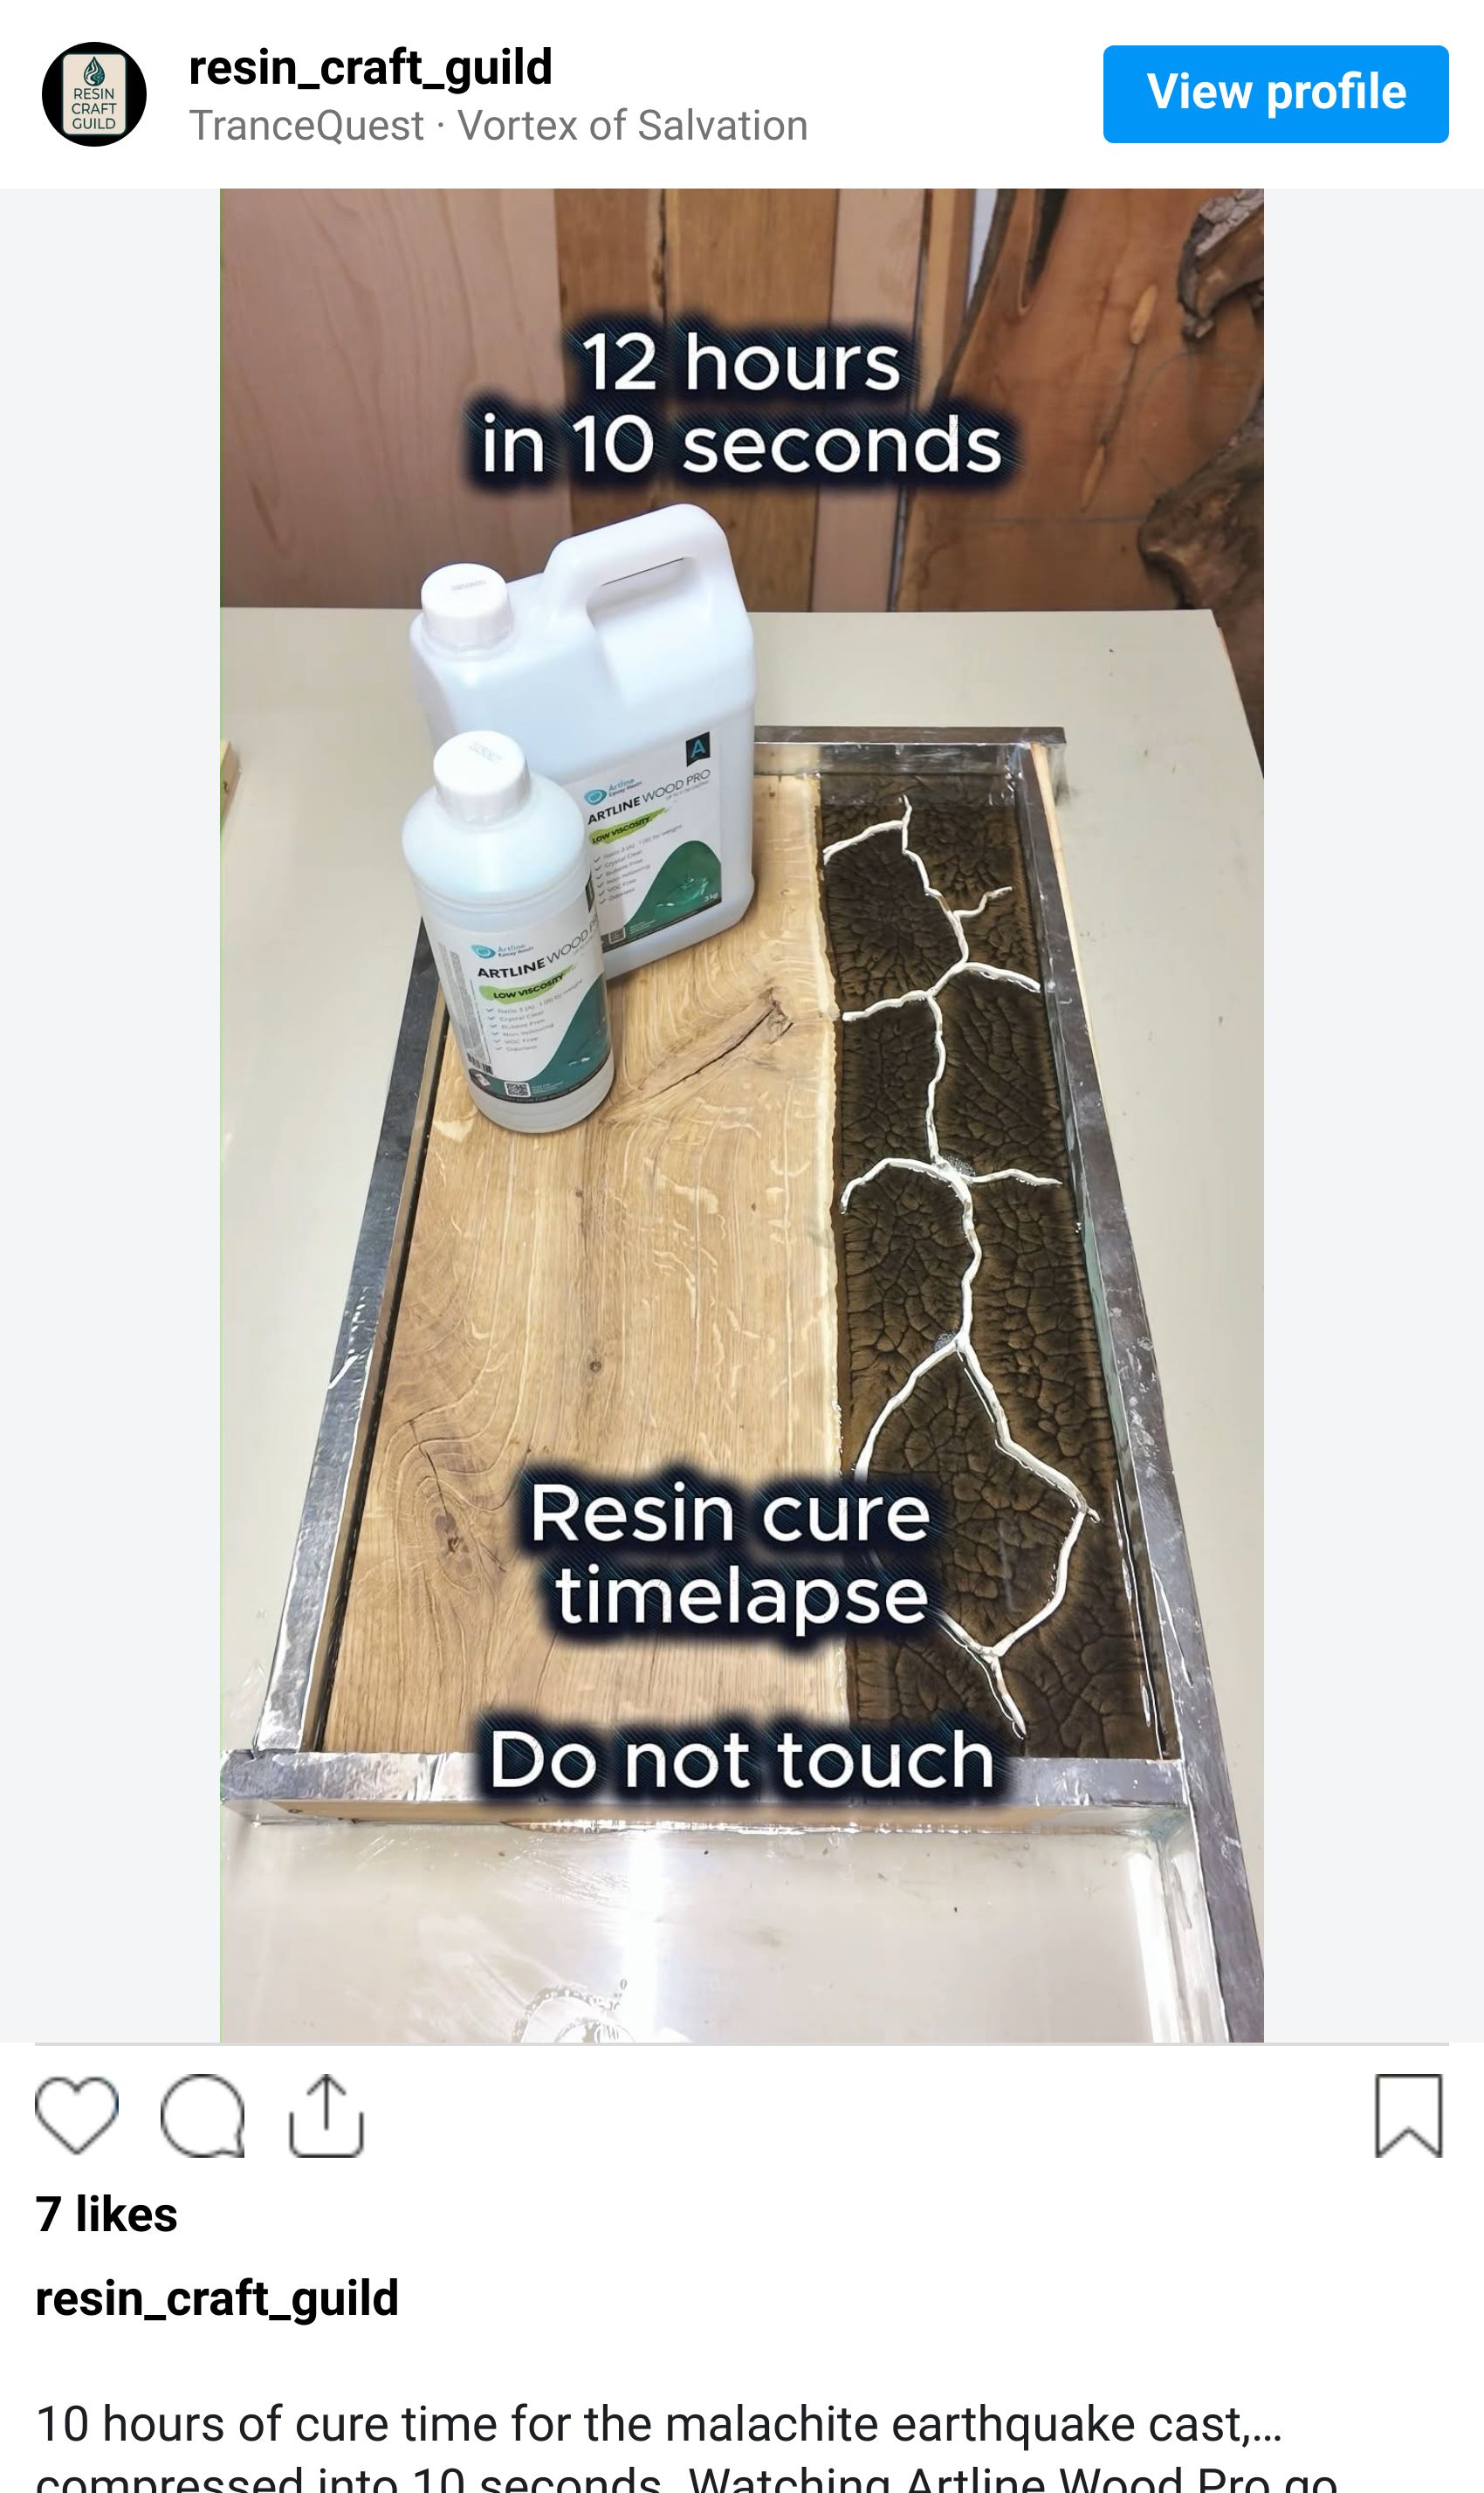
6. Creating a Deep Pour 3D Effect
A more advanced option for achieving real depth is to work with the epoxy's gel phase rather than against it. Timing the layers around the gel stage — not just cure state — is what makes the difference.
Pour one or more colored base layers first.
Wait until the resin moves into the gel phase — viscosity increasing, still pliable but no longer fluid.
Pour a transparent layer directly over the gelling base.
Because the base hasn't fully locked, the two blend at the boundary rather than forming a hard line — particularly at the edges. The result reads as genuine three-dimensional depth, not two stacked pours.
Timing is everything. Too early and the layers merge completely. Too late and you get a hard boundary — same as a standard two-layer pour. The gel window varies by resin system and temperature, so run a small test batch first to learn what your specific resin's gel phase looks and feels like before committing to a full piece.
This is actually my favorite way to work with color. The blend at the gel boundary means there are no visible layer lines on the cast sides — the depth looks continuous, not stacked. That's hard to achieve any other way.

One of my projects showcasing the 3D resin effect
7. Metallic and Shimmer Effects with Mica Powder
Mica powder is the fastest way to get results that look expensive. It's also the fastest way to get results that look cheap if you use it wrong.
Mica works by catching and reflecting light from its flat, plate-like particles. The shimmer you see depends on those particles staying aligned — mostly flat, mostly near the surface where light can reach them. The common advice is to avoid mica in deep pours because of settling. In practice, with a quality powder, I use mica in deep pours regularly without issues — the key is powder fineness, not pour depth alone.
What actually works:
For surface shimmer on a flat casting: add mica at 1.5–2% by weight to a thin topcoat layer (5–10mm). The thin depth means particles stay close to the surface and the short cure distance means less settling time.
For deep pours with mica: use a fine, high-quality powder and a slower-curing deep pour resin. I've had consistent results this way — but test with your specific powder and resin combination before committing to a full piece.
For a full metallic opaque effect: combine mica powder with a small amount of pigment paste in the same color family. The paste stops light from passing through the pour entirely, so the mica shimmer sits against an opaque background. This reads as true metallic.
For marble or swirl effects: add mica powder to a small portion of resin separately from your main pour. Pour the main (clear or base color) pour first, then drop the mica-loaded resin in and use a toothpick to swirl without overmixing. The contrast between the mica vein and the base color is the effect.
Touch or do not touch
This is one of those things nobody tells you upfront. If you leave the cast alone during the gel phase, a natural organic pattern develops on its own — mica particles drift and settle into formations you couldn't plan if you tried. If you want more control, carefully swirl the cast during the gel phase to guide the mica into specific paths. And you can combine both — even after swirling, the mica particles continue to drift slightly as the resin gels, softening the edges of whatever pattern you created. That final drift is part of the result, not a loss of control.
I filmed a timelapse showing natural mica patterns forming during the gel phase — worth watching to see how much movement happens without any intervention:
Why natural patterns form
There's actual physics behind this. As resin cures, the exothermic reaction generates heat unevenly across the mass — warmer and cooler zones create surface tension gradients across the liquid. Fluid naturally flows from low surface tension areas toward high surface tension areas, pulling pigment and mica with it. This is called the Marangoni effect, and it's responsible for the cell-like and swirling formations that appear without any intervention. Convection currents from the rising heat add to this movement. Mica plates also resist sinking edge-on due to their flat shape, which is why they tend to orient horizontally as they settle — and why they catch light so consistently in the finished piece. Once you understand that these patterns are physically driven, you stop fighting them and start working with them.
What doesn't work:
Low-quality or coarse mica powder in any pour depth. The particles are too heavy to stay suspended and too large to catch light evenly. If mica is settling on you, check the powder quality before blaming the technique.
8. Alcohol Inks: The Beautiful, Unpredictable Option
I want to be honest about alcohol inks because most tutorials aren't.
Alcohol inks are widely used in resin art and for creating ocean effects — the kind of layered blue-green wave patterns that have become one of the most recognizable styles in decorative resin work. They're also the most variable colorant you can use, which means the same technique on the same day with the same inks can produce different results depending on your resin's viscosity, the ambient temperature, and how you move the mold.
What you can control:
The color combination. Alcohol inks don't mix into a single blended color the way pigments do — they move against each other. Complementary colors (blue + orange, red + green) create contrast. Analogous colors (blue + purple + pink) create harmony.
The application method. Always add alcohol inks to the poured surface, not into the mixing cup — dropping them onto the surface is what creates the organic spreading patterns. Using a heat gun to move them after application gives you further control over surface patterns.
The heat. A quick pass with a torch or heat gun activates movement in alcohol ink layers. Too much heat and the patterns collapse. Too little and they freeze where they land.
What you can't fully control:
The exact final pattern. This is a feature, not a bug. Alcohol ink resin pours are inherently one-of-a-kind. If you need reproducible results — same color, same pattern — use pigment pastes.
My take: I don't use alcohol inks in my projects personally. Still, they are a great option for art panels and decorative pieces where uniqueness is the point — ocean effects, resin art, one-of-a-kind results. I wouldn't suggest using them for matched sets, production pieces, or anywhere a client needs to approve a color before you commit to a full pour.
9. Color Combinations That Work
Some practical combinations from what makers consistently reach for, plus honest notes from my own workshop.

Black resin + light wood (maple, ash or oak): The most searched combination right now and for good reason. Black resin against a pale wood creates maximum contrast — graphic, modern, works in almost any interior. Matte black reads differently from gloss black against the same slab, so decide on your finish before you pour.
Deep ocean blue + walnut: The classic river table combination. Blue is consistently the most requested resin color. Worth knowing: transparent blue over warm-toned wood pulls toward teal — I tried it once and didn't like the result. An opaque or semi-opaque blue keeps the color truer. Test on a scrap of your actual slab first.
Mixed mica swirls (gold, copper, pearl): Metallic mica combinations — particularly warm tones — are widely used for decorative pieces and art panels. Gold + black mica in the same pour creates the kind of galaxy or geode effect that drives a lot of resin art. The swirl technique from Section 7 applies directly here.
Emerald green + dark wood: Less common than blue but striking. Works best with walnut or darker species where the green doesn't compete with the wood's own warmth.
Clear resin + wood: Not a color choice — a design choice. Clear resin showcases the wood entirely. Often underestimated as an option by beginners who feel they need to add color.
10. The Reality Check — What Finished Color Looks Like vs. Wet Color
This is the section every tutorial skips. It cost me several pours before I figured it out properly.
Wet resin is always darker than cured resin. The liquid surface is glossy and reflective, bouncing light back to your eye and making color appear richer and more saturated. Once cured and sanded, that surface scatters light and the color reads noticeably lighter — the shift can be significant, especially with transparent colorants.
Opaque pigments shift less than transparent ones. A fully opaque white pour will look nearly identical wet and cured. A deep transparent blue will look dramatically lighter when cured.
Mica reads differently under different light. Under workshop fluorescent lighting, mica shimmer looks moderate. In natural light or under a spotlight, it becomes much more prominent. Don't assess mica effects under flat artificial light — you're not seeing what your customer or their home will see.
Surface finish changes the perceived color. The same pour, sanded to 400 grit, sanded to 1500 grit, and polished to a mirror finish will look like three different colors. The polished surface reads the deepest and most saturated. If you're comparing results across projects, compare them at the same finish level. The full sanding sequence is covered in the RCG epoxy processing guide.
❝ Test tiles are not optional for color work. Make a tile at the actual depth you're pouring, using the same wood substrate if applicable, finished to the level you intend. That tile is your reference. Everything else is estimation.
Processing Your Colored Resin: What Changes
If you're new to processing cured resin — sanding, finishing, surface work — the Epoxy Processing for Beginners: Complete Sanding & Finishing Guide covers this in detail. One note that applies specifically to colored resin: during sanding, the sanding dust mixes with the top surface and can temporarily shift the apparent color. Wipe the surface clean with a lint-free cloth and a small amount of isopropyl alcohol between grits to see the true color at each stage. Don't assess the final result when the surface is dusty.

Save with the Guild
A couple of deals from partners where you can save on colorants and materials for your next pour.
Eye Candy Pigments — Mica powders, pigment pastes, colorshift and specialty pigments for resin work. One of the most respected colorant brands in the maker community — wide color range, ships worldwide, and they offer sample sets so you can test colors before committing to full sizes.
Click the link or use code resincraftguild for 10% off your entire order.
Artline Resin — Tools, supplies, and colorants for resin and woodworking projects. Worth checking their colorant range alongside the other options here.
Click the link or use code ResinCraftGuild for 10% off your entire order.
Resiners — Resin, colorants, and casting supplies. Good range of liquid pigments and mica powders alongside their resin systems.
Click the link or use code ResinCraftGuild15 for 15% off your entire order.
Affiliate disclosure: Some links in this section are affiliate links. If you purchase through them, I may earn a small commission at no extra cost to you. I only recommend trusted products relevant to the topic.
Stay with the Guild
If this guide was useful, the newsletter covers this territory every week. Tested techniques, honest product reviews, real projects — three minutes, every Tuesday. 1,100+ makers already get it. → Subscribe at resincraftguild.com
Frequently Asked Questions About Resin Coloring and Pigments
Can I use acrylic paint to color epoxy resin? Generally possible — acrylic paint can be mixed into resin in small amounts without immediately causing issues. That said, my suggestion is to stick to the colorants described in this guide. Purpose-made resin pigments and dyes are formulated to work with epoxy chemistry, give more predictable results, and remove one variable from an already complex process. Acrylic paint is a workaround, not a first choice.
Why did my pigment sink to the bottom of the mold? Two reasons, usually combined. First, the pigment particles are heavier than the resin and the resin's viscosity isn't high enough to hold them in suspension through the full cure time. This is common with mica and some coarser pigment pastes in thin, fast-curing resins. Second, the pour may have been too deep for the pigment type. Solution: use a slower-curing resin formulated for deep pours, reduce pour depth, or switch to a finer pigment or liquid dye that fully dissolves rather than suspending as particles.
Why does my resin look cloudy after adding pigment? The most common cause is water-based colorant — the moisture reacts with the epoxy chemistry and creates a milky haze. Candle dye, food coloring, and watercolor are the usual culprits. If your colorant is resin-compatible and cloudiness still appears, check whether the resin was fully mixed before adding pigment, and whether the pour temperature was too low — cold resin clouds more easily.
Can I mix different brands of pigment together? Generally yes, if you're mixing two pigment pastes or two liquid dyes. The colorant is usually inert once dispersed in a resin-compatible carrier. Mica powders from different brands can also be mixed freely — since they're mineral-based particles rather than carrier-dependent, brand differences matter less. Where mixing brands can cause issues is with products that have significantly different carrier formulas — results can be unpredictable. When in doubt, test in a small cup before using in a full pour.
How do I get a consistent color across multiple pours of the same project? Weigh everything. A specific color result is a formula: X grams of colorant per 100 grams of mixed resin. Write it down the moment you mix a batch you're happy with. Without the weight ratio, you're guessing from the cup color, which varies with ambient light and your eye's fatigue. With the weight ratio, you can reproduce the same color six months later.
What's the best colorant for a river table where I want to see the wood grain through the resin? Liquid resin dyes are the safest starting point — they're fully transparent when cured at the right loading and the grain reads clearly through the color. That said, if you want to experiment with mica or pigment paste, it's possible at low ratios — just make a test tile first. Mica at higher amounts will start to obscure the grain, and pigment pastes go fully opaque, so the further you push them the less wood you'll see. Test on a scrap of your actual slab before committing to the full pour.
Why did my color come out much lighter than I expected? Wet resin looks significantly darker than cured resin — often 20–30% — because the liquid surface is glossy and reflective, making color appear richer to the eye. Once cured and sanded, the surface scatters light and the color reads lighter. The fix is to calibrate with test tiles at the actual pour depth before committing to a full batch, and to accept that you'll need more pigment than you think to hit a deep, saturated finished color.


Petr from Resin Craft Guild
© 2026 Resin Craft Guild | www.resincraftguild.com