Hey fellow crafters,
Most resin inlay guides show you how to pour colored epoxy into a routed channel and call it done. That works. It also looks like colored epoxy in a routed channel.
This guide covers malachite inlay - specifically, inlaying real crushed malachite stone into oak, locked in place with transparent resin, flush with the surface. The channels follow the natural grain flow of the board. The stone's own banding does the work. The result looks like something that belongs in the wood, not something added to it.

This piece was made in partnership with Artline Resin - Natalie, the founder, agreed to supply the epoxy for the project and for its review. The resins used throughout this build are Artline Crystal and Wood Pro. If you want my full honest assessment of both products - how they mixed, released bubbles, cured, and sanded - that's in the newsletter issue covering this project rather than here, so this guide stays focused on the technique.
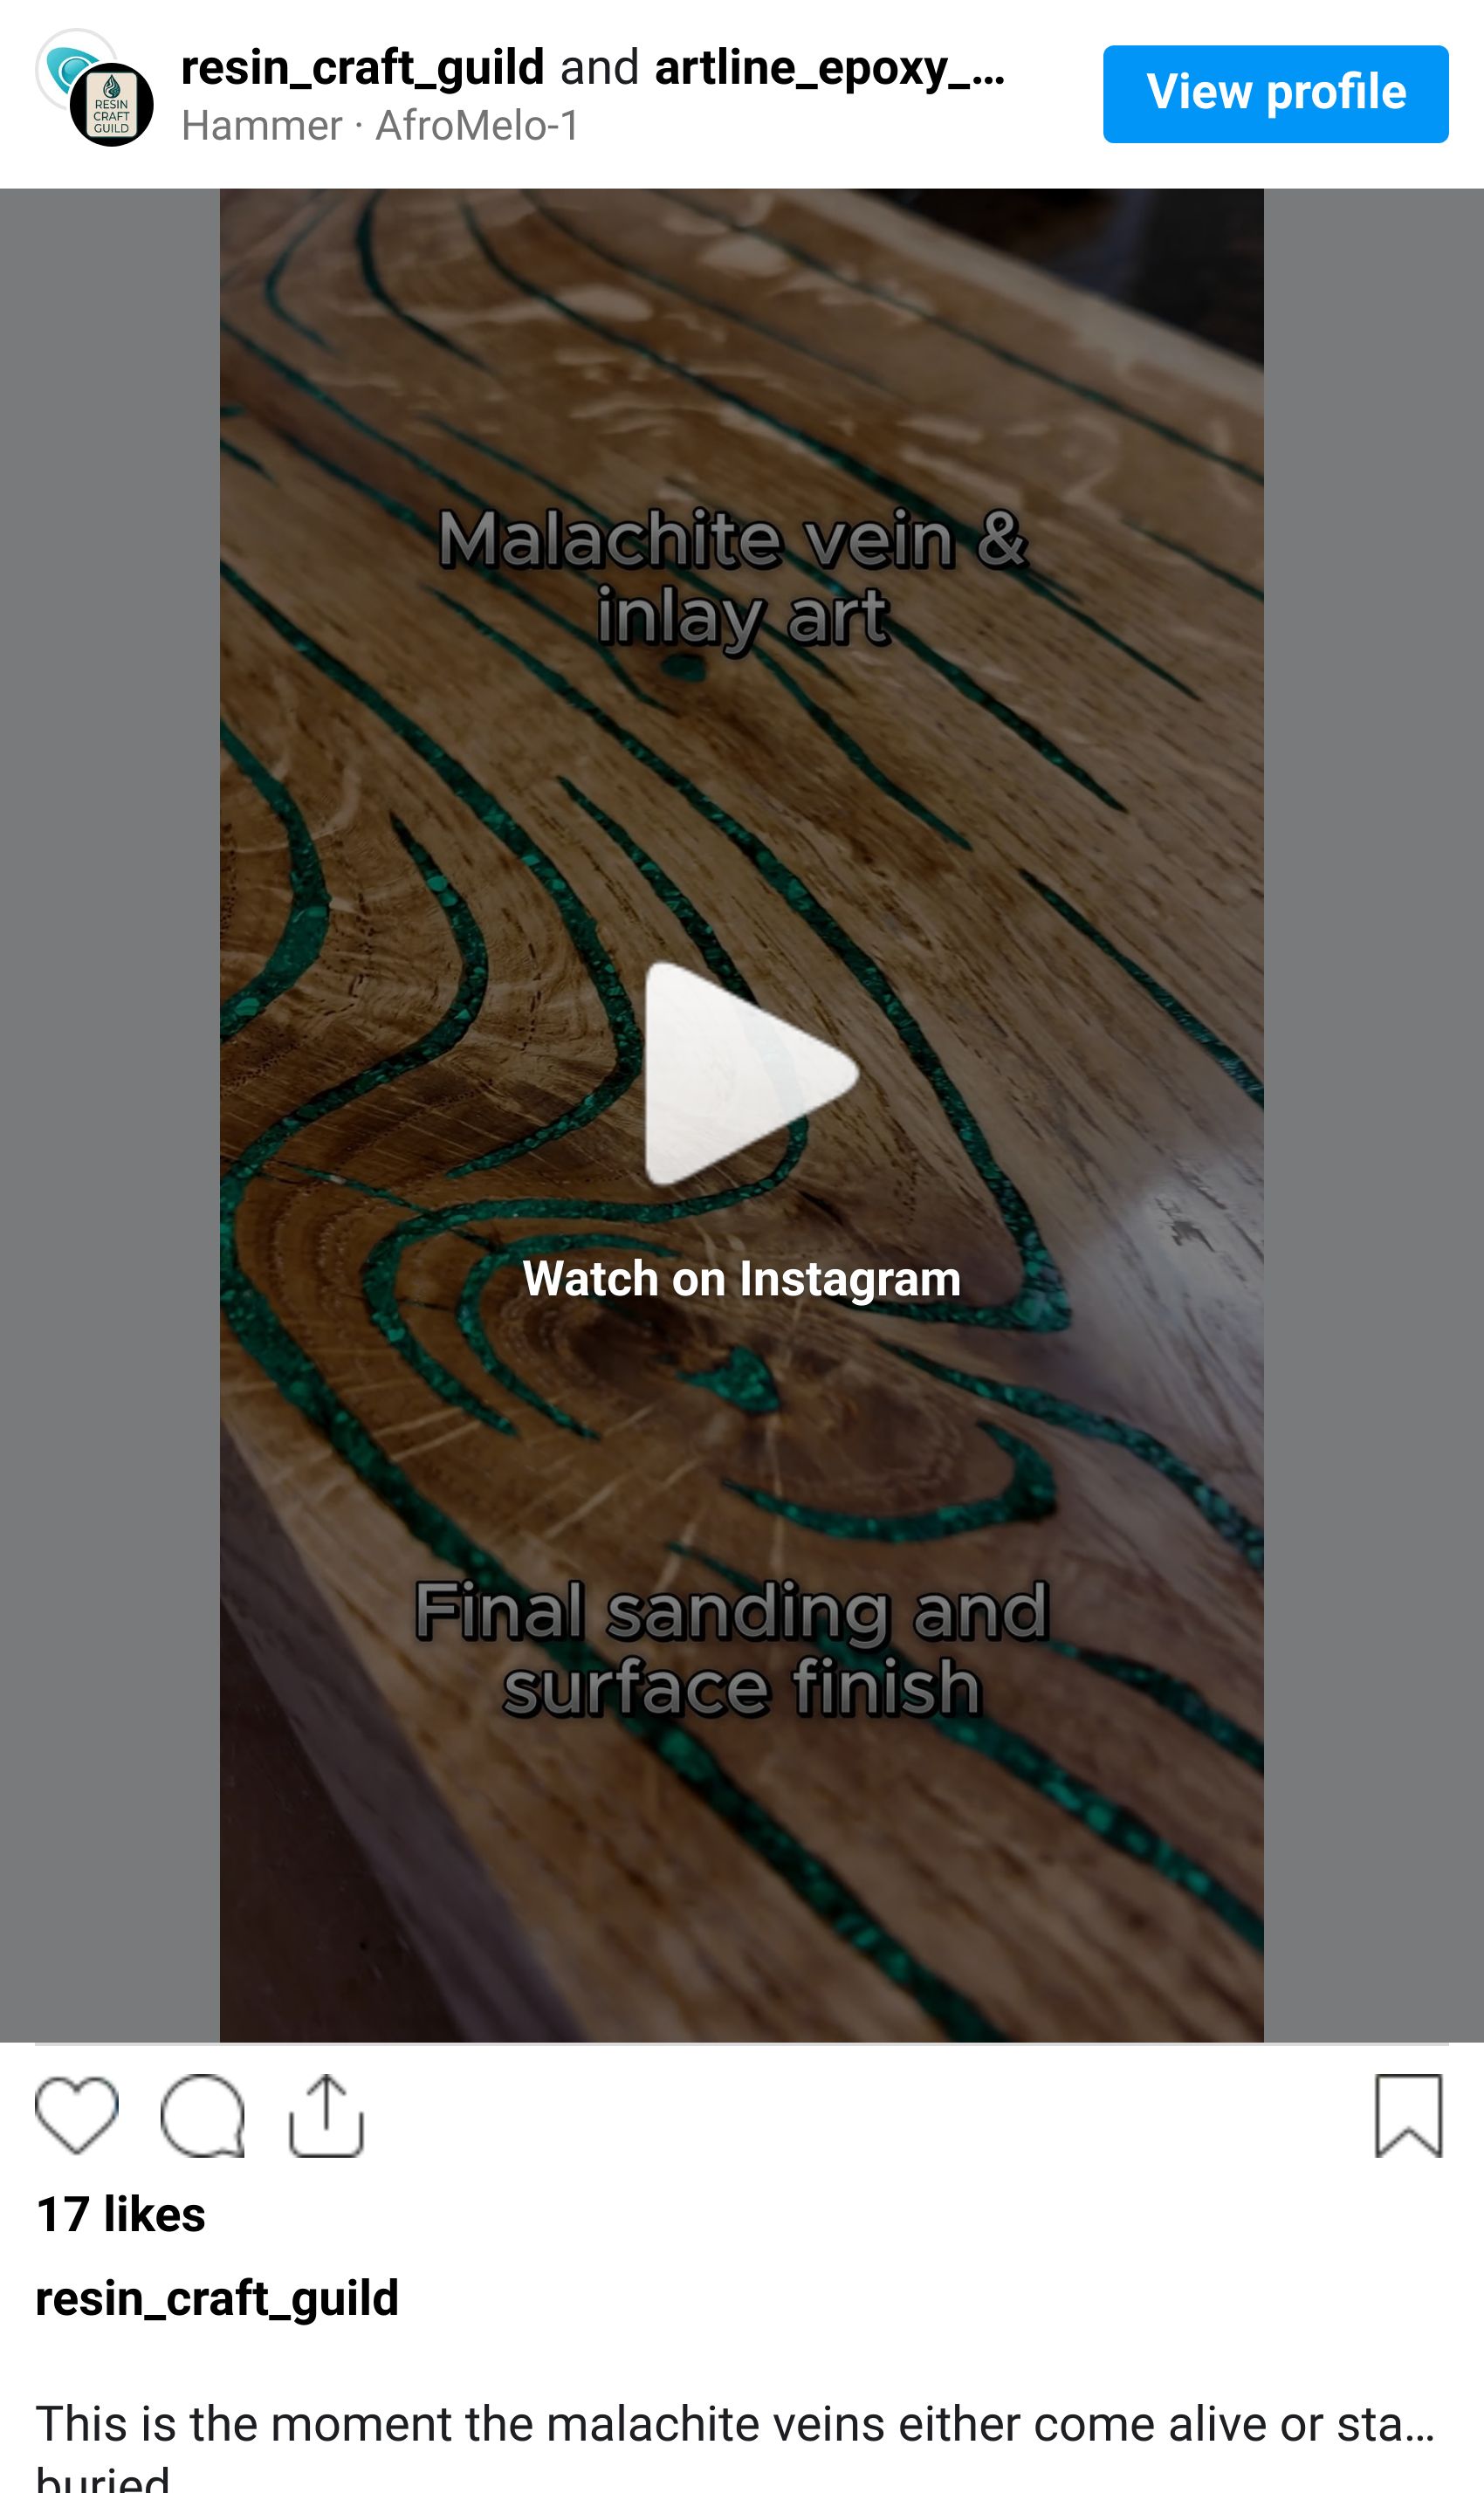
This is Part 1 of a two-part series. The oak inlay is the simpler of the two techniques. Part 2 covers the malachite vein art panel - a separate epoxy casting where the same stone appears as glowing veins through a dark bronze ground, built using a clay wall technique. The two pieces in the photos are opposite halves of the same board.
This is an intermediate build. It assumes you can mix and pour epoxy, understand pot life and cure time, and know how to use a router. If you're still building those fundamentals, start with the RCG epoxy preparation guide before attempting this.
Today's Lineup:
1. What You're Actually Making
The oak section of the finished piece carries crushed malachite stone running in narrow channels along the grain. Some channels are straight runs along the board length. Where the grain curves around a knot, the channels curve with it. The stone is packed into 2-3mm deep routed grooves, fixed with low-viscosity clear epoxy, cured, and sanded flush with the oak surface.

What you see in the close-up photo is the malachite sitting level with the wood - no proud edges, no epoxy pooling around the stone. The grain and the inlay read as one surface. That result comes from the routing depth, the stone particle sizes, and keeping the epoxy fix off the surrounding wood face during application.
The finished piece is 37 x 62 cm - but size is entirely your call. The technique works the same regardless of board dimensions; just scale your malachite quantity and epoxy volumes accordingly.
The finished surface gets Osmo hard wax oil over everything - oak and malachite inlays together in one pass.
2. Materials and Tools
Stone and epoxy:
Crushed malachite stone - 0.5-3mm particle size (see note below)
Artline Crystal Resin - for fixing the stone and inlay fills. 2:1 by weight, 60-minute pot life, maximum 2cm per pour. Low viscosity is exactly what you want when filling tight routed channels without trapping air. Use code ResinCraftGuild for 10% off.
Sandpaper: 80, 120, 180, 240, 320, 400, 800 grit
Tooling:
Dremel with two bits: 1/8 inch (3.2mm) 90° V-bit for the channel lines, base engraving bit for cleaning the channel floor
Router sled or hand plane for final flattening
Compressed air or soft brush for channel cleaning
Small spatula or toothpick for stone placement
Thin brush or pipette for epoxy application
Resin mixing set: digital scale, mixing cups, silicone mixing sticks
Orbital sander for final surface work
Spirit level
Gloves
Protective mask (P2/FFP2 minimum) - malachite dust is toxic when sanding
Finishing:
Osmo Top Oil or equivalent hard wax oil - over the whole surface including inlays
Soft cloths
On sourcing malachite: Real crushed malachite is not a craft supply store item. Source it from mineral suppliers or lapidary shops - it comes pre-graded by particle size. For routed wood channels, 0.5-3mm is the right range. Finer than 0.5mm behaves more like pigment dust than stone - you lose the natural banding. Coarser than 3mm won't sit cleanly in a narrow channel or sand flush without leaving proud edges. The stone's natural color variation - pale to mid to near-black green - is what makes this worth doing with real material instead of green pigment.
3. Choosing and Preparing the Oak Board
Oak grain is the design. Before you touch the router, spend time reading the board.
Knots, ray fleck, grain direction changes - these are your reference points. The malachite channels will follow the grain flow, so the stronger and more interesting the grain, the more interesting the finished inlay. A board with a knot and grain curves around it gives you natural channel paths that look intentional. A featureless straight-grained board gives you straight lines and nothing more.
Check the board for moisture content before you do anything else. As with any epoxy project, maximum 12% moisture - above that the wood is still moving, and movement after the inlay is fixed will crack the stone out of the channels. A cheap moisture meter is worth having in any workshop where epoxy is involved.
Plane the board and bring it to uniform thickness before routing. Both faces need to be flat and parallel - not just for the routing stage, but for the flattening and finishing work later. Any thickness variation across the board becomes a problem when you try to sand the inlay flush. Do it now, before a single channel is cut.
4. Routing the Inlay Channels
Drawing the channels
Draw your channel paths freehand along the grain with a pencil. Don't try to be precise in the ruler-straight sense - slightly irregular lines that follow natural grain movement look better than mechanically perfect ones. Around knots, let the lines curve the way grain naturally curves around them.

Spacing is a visual decision. Looking at the finished piece, a mix of single narrow lines and occasional paired lines reads well. Roughly two-thirds of the visible grain surface is left untouched - the negative space between channels is what makes the inlay lines register.
Routing
Use a Dremel with a 1/8 inch (3.2mm) 90° V-bit for the channel lines - this gives you the tapered profile that holds the stone securely. Follow with the base engraving bit to clean the channel floor flat. Target depth: 2-3mm. The V-bit geometry means the channel is slightly wider at the top than the base, which actually helps with stone placement - particles lock in rather than sitting loose.
Work with the grain direction, not across it. Keep the tool moving at consistent speed - stopping in place creates uneven depth and burn marks. On curves around knots, slow down and follow the pencil line steadily.
After routing, clean every channel thoroughly with compressed air or a soft brush. Wood dust and routing debris left in the channel will contaminate the epoxy fix and cloud the finished inlay.

❝ My take: Freehand routing can be shaky at first - the Dremel wants to drift and your hand isn't used to the resistance yet. It gets better with practice, but practice on a scrap board first. Route a few test channels on offcut oak before you touch your best board. By the time you move to the real piece, your hand is steadier and you've already learned where the bit wants to wander.
5. Placing and Fixing the Malachite Stones
This is where the technique either works cleanly or creates problems you'll spend the finishing stage trying to fix. The two things that matter: keeping the epoxy inside the channel, and getting full stone coverage without voids.
Placing the stones
Start with the larger particles first - place them into the channel individually, positioning them along the length. Then fill the gaps between them with the finer crushed material, guiding it in carefully with a small spatula or toothpick. Take your time placing the stones rather than forcing it - pressing too hard shifts what you've already positioned. The stone will sit slightly proud of the surface - this is correct and expected. You'll sand it flush later.

Applying the epoxy fix
Mix a small batch of Artline Crystal Resin - no colorant. Its low viscosity is the key property here: it wicks down between stone particles and fills voids from the bottom up rather than sitting on top of the pack. Mix at 2:1 by weight, pot life is 60 minutes so no rush.
This is the step where most problems originate. Too much epoxy floods out of the channel onto the surrounding oak face. It sands off cleanly without leaving any trace - but the more overfill, the more sanding time it costs you later. Apply conservatively. You can always add a second thin application if voids remain after the first cure.

Allow to cure fully - 24 hours minimum before any sanding.
❝ Here's what catches people: the channel looks full when placing the stones, but epoxy finds every void as it wicks down through the particles. After curing, check each channel carefully in raking light. Small depressions or pinholes where the epoxy didn't fully reach are normal. Fix them with a drop of CA glue - it fills the void cleanly and cures fast. Sand flush once dry.
6. Processing: Flattening, Sanding, and Finishing
Flattening and sanding
⚠️ Wear a protective mask rated P2/FFP2 or higher throughout all sanding steps. Malachite contains copper compounds - the fine dust produced during sanding is toxic. Don't skip this.
Do not use a router sled or hand plane over the malachite inlay - the stone destroys bits immediately. This is exactly why the board had to be flattened and brought to uniform thickness before routing. The oak surface is already flat; now it's just a matter of sanding the proud stones down to meet it.
Start at 80 grit with the orbital sander to bring the stones level with the surrounding oak. Work evenly across the surface, checking frequently in raking light. Once the stones are flush, progress through 120, 180, 240, 320, 400, 800. The malachite and epoxy fill sand alongside the oak without issue. Between each grit, wipe the surface clean - dust from the previous grit scratches the next grit's work.
At 800 grit, the malachite-filled channels will have a polished clarity - the stone particles visible through the cured transparent epoxy. This is the result you're working toward.
If you're joining the oak board to an epoxy panel, the router sled is used to flatten the epoxy panel only - never over the oak inlay section. The processing guide covers router sled setup in detail.
Finishing
Apply Osmo Top Oil or equivalent hard wax oil over the entire surface - oak and malachite inlays together. The stone is flush with the wood, so the oil goes over everything in one pass. Use a cloth to work it into the grain, following the manufacturer's instructions for application and drying time between coats. Two coats, buffing lightly with a white pad between them.
A note on grit: hard wax oils typically only need the wood sanded to 220-320 grit before application. The reason I go to 800 here is the malachite - the extra grits polish the stones themselves and the epoxy fill to a clarity that 320 grit alone won't give you. The oak is fine either way; it's the channels you're doing it for.
7. Reality Check
The oak inlay is a quite simple process. The steps are sequential, the materials are straightforward, and there are no stages that require particular skill beyond patience with stone placement and the sanding sequence.
In my project I have cast the vein art panel directly against the oak board - the two are naturally joined as part of the casting process, so the final sanding to bring both surfaces level is done together in one pass. If you're building the combined piece, that's the efficient approach: don't finish the oak inlay independently and then try to match it to the epoxy panel later.

Total build time is realistic at two to three days when you account for cure time between steps. One day to route and place stone, one cure day, one processing and finishing day. Don't compress this by working on partially cured epoxy.
If this is your first inlay project, route a short test section on scrap oak first. Place stone, apply epoxy fix, cure, and sand flush before committing to the full board. The test costs an hour and tells you whether your routing depth and epoxy application technique are dialed in.
The walnut coffee table mentioned in Part 2 will use the same oak inlay technique at larger scale. The process doesn't change - it just takes longer.
Petr Resin Craft Guild www.resincraftguild.com
If this guide was useful, the newsletter covers this territory every week. Tested techniques, honest product reviews, real projects - three minutes, every week. 1,100+ makers already get it. → Subscribe at resincraftguild.com
Next in this series: The malachite vein art panel - the same stone, a dark bronze epoxy ground, and the clay wall technique that creates glowing vein channels through a solid casting. Covered in Part 2: Malachite Vein Art Panel.
Save with the Guild
Artline Resin - European brand (Slovenia) supplying the Crystal Resin and Wood Pro used in this project. Crystal Resin is what I used for all the malachite inlay and channel fills - 2:1 mix, low viscosity, excellent air release. Ships EU with free shipping from €150, no customs fees for European makers. Use code ResinCraftGuild for 10% off your entire order.
Frequently Asked Questions About Malachite Stone Inlay
What is the best epoxy for malachite stone inlay in wood? Use a low-viscosity clear epoxy for fixing the stone - it wicks down between stone particles and fills voids more effectively than thicker formulas. Choose a thin-layer formula with a maximum 24-hour cure time. Avoid deep-pour resins for this step; they cure too slowly and hold up the rest of the build.
What particle size of crushed malachite works best for wood inlay? 0.5-3mm is the practical range for routed channels of 1-2mm width and 2-3mm depth. Finer than 0.5mm behaves like pigment dust and loses the natural stone texture. Coarser than 3mm won't pack cleanly into a narrow channel and won't sand flush without leaving proud edges.
Can you use real malachite dust instead of crushed stone? Very fine malachite dust disperses into the epoxy and behaves more like a pigment - you lose the natural banding and particle texture that makes real stone worth using. Stick with crushed stone above 0.5mm particle size.
Does the malachite need to be sealed before applying epoxy fix? No. The epoxy fix is the seal - it wicks into the stone pack and encapsulates the particles as it cures. No primer or pre-sealing step is needed.
Why does the malachite color look different in some channels than others? Natural variation in the stone. Malachite's banding - pale green through mid green to near-black - varies between particles and between batches. This is a feature, not a problem. Channels packed with finer, more uniform material read consistently; channels with mixed coarser stone show more variation. Both are correct.
Can I do malachite inlay in woods other than oak? Yes - any hardwood you can rout cleanly works. Oak suits this technique particularly well because its strong grain flow gives you natural channel paths to follow, and the warm honey tone contrasts well with the green stone. Walnut's darker ground reduces contrast with the malachite - you may want to space channels differently. Ash behaves similarly to oak.
Do I need to seal the oak before routing and inlaying? No sealing step is needed. The epoxy fix seals the inlay channels as it cures. And if you're casting the vein art panel directly against the oak board as in this project, the dual-layer pour means any off-gassing from the wood is absorbed into the base layer without affecting the result - no special preparation of the oak face is necessary.
Part 2: Malachite Vein Art Panel - Epoxy Guide (2026 Edition) - The clay wall technique, bronze ground, and transparent channel fill on a full epoxy casting
Epoxy Casting for Beginners: Complete Preparation Guide (2026 Edition) - Mold setup, pour depth, mixing - the foundation this guide builds on
How to Remove Bubbles in Epoxy Casting (2026 Guide) - Wood sealing and degassing, relevant if combining this inlay with an epoxy panel
How to Color Epoxy Resin: Complete Pigments & Dyes Guide (2026 Edition) - Mica powder technique referenced in the vein panel build
© 2026 Resin Craft Guild | www.resincraftguild.com
Affiliate disclosure: Some links in this guide are affiliate links. If you purchase through them, I may earn a small commission at no extra cost to you. I only recommend products I've personally tested and trust.
P.S. Never thought making inlays could be so deadly... in this direction.