Hey fellow crafters,
❝ In Part 1: Malachite Stone Inlay in Oak, we covered routing grain-following channels into an oak board, placing real crushed malachite, and finishing flush. The epoxy panel in these photos is the other half of the same piece. This guide covers how it was made - and the clay wall technique is what makes it work.
The vein art panel is the more complex of the two malachite techniques - and the one that draws more questions. The oak inlay is sequential and largely forgiving. This malachite vein art process has a step that will test your patience: building clay walls, pouring around them, waiting for full cure, and then removing the clay to reveal the channels. It works. But it is slow, careful work - especially the clay removal stage.
I'll be direct about that. Getting the clay out cleanly is the most tedious part of this entire build - and cleaning the channels afterward is even more so. I used a screwdriver to work the clay free section by section, then went through each channel carefully to remove every fragment before filling. The silicone release coating helps, but it still comes out in pieces rather than in one pull. I'm still looking for a better release material for the next version. If you find one that works well, I'd genuinely like to know.
What you get at the end of this process: a dark bronze epoxy panel with malachite veins running through it, the stone locked in transparent resin, glowing green against the dark ground. Alongside the oiled oak inlay panel, it's a piece that stops people.

This piece was made in partnership with Artline Resin - Natalie, the founder, agreed to supply the epoxy for the project and for its review. The resins used throughout this build are Artline Crystal and Wood Pro. If you want my full honest assessment of both products - how they mixed, released bubbles, cured, and sanded - that's in the newsletter issue covering this project rather than here, so this guide stays focused on the technique.
This is Part 2 of a two-part series. The oak inlay is the simpler of the two techniques. Part 2 covers the malachite vein art panel - a separate epoxy casting where the same stone appears as glowing veins through a dark bronze ground, built using a clay wall technique. The two pieces in the photos are opposite halves of the same board.
This is an intermediate to advanced build. It assumes you can mix and pour epoxy, understand pot life and cure time, and know how to use a router. If you're still building those fundamentals, start with the RCG epoxy preparation guide before attempting this.
Today's Lineup:
1. What You're Actually Making
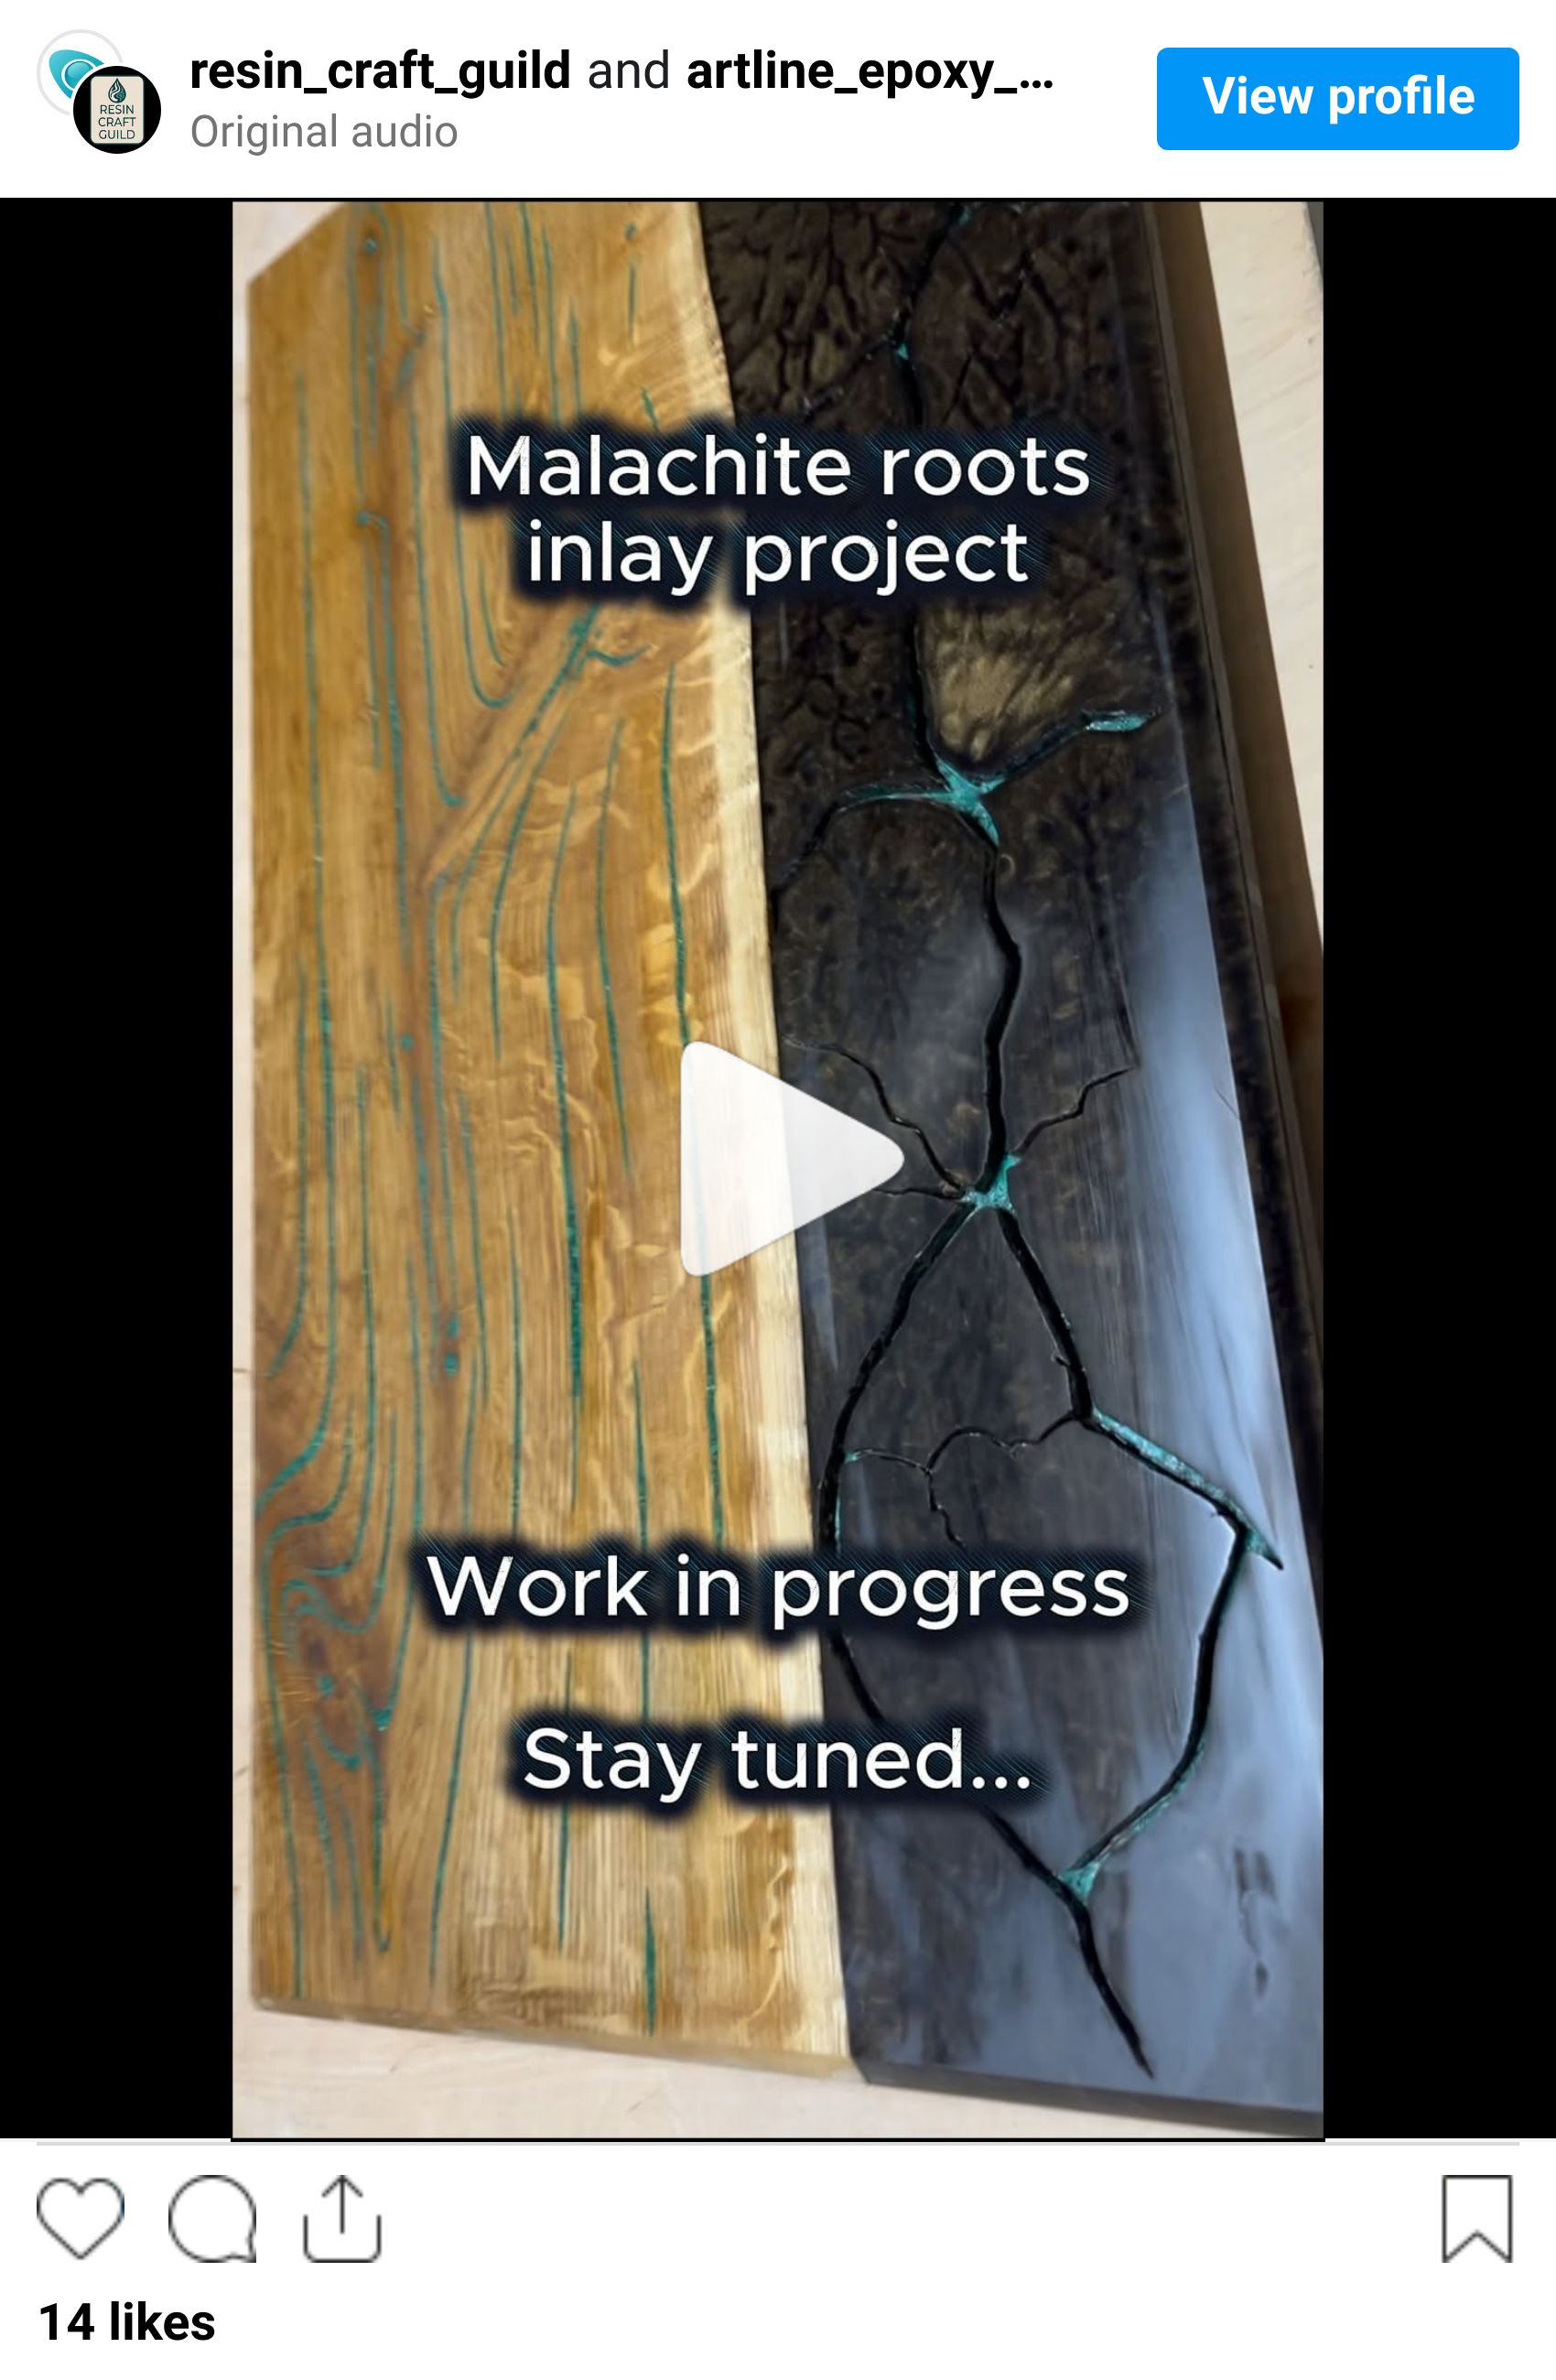
The panel in the photos is a solid epoxy casting with a dark bronze-brown ground and malachite stone veins running through it, paired with an oak inlay board - the combined piece is 37 x 62 cm. The veins are inverted channels - carved out of the casting by the clay walls - filled with real crushed malachite locked in clear resin.

The texture visible on the epoxy ground in the photos is the natural result of the mica powder moving during the cure. That surface texture - organic, almost geological - comes from the Marangoni effect: convection currents from the exothermic reaction create movement in the mica particles as the resin gels. You don't engineer it. You let it happen.
The vein paths are your design decision. On this piece they follow a cracked-earth or branching pattern - wider channels that fork and narrow. The clay walls define those paths, so you draw them during the wall-building stage, not during the pour.
This is an intermediate to advanced build that assumes confidence with epoxy mixing, mold construction, and basic casting. The RCG epoxy preparation guide covers everything you need before attempting this.
2. Materials and Tools
Epoxy and colorants:
Artline Wood Pro - for the base and second ground pours. 3:1 by weight, up to 5-6cm per layer, self-leveling. This is the structural resin that makes up the bronze panel body. Use code ResinCraftGuild for 10% off.
Artline Crystal Resin - for the transparent channel fill. 2:1 by weight, 60-minute pot life, maximum 2cm per pour. Low viscosity handles the narrow channels without trapping air.
Vacuum chamber (optional) - for degassing resin batches before pouring
Small torch - for surface bubbles after pouring
Dark bronze mica powder - for the ground color
Mold construction:
PE sheet (polyethylene) for the mold base
Aluminum tape for mold walls
Silicone sealant for sealing mold seams
Spirit level
Clay wall technique:
Air-dry modeling clay (basic play clay)
Silicone sealant - for coating clay walls before the second pour
Screwdriver and wooden skewer - for clay removal
Dremel - for shaping channel walls and removing epoxy seepage
Stiff brush - for channel cleaning
Stone and fill:
Crushed malachite stone - 1-5mm particle size
Small spatula or toothpick for placing stones
Thin brush for epoxy fix application
Processing and finishing:
Router sled for flattening both faces
Sandpaper: 120, 180, 240, 320, 400, 600, 800, 1000, 1500, 2000, 3000 grit
Polishing machine
Polishing paste
Soft cloths
Protective mask (P2/FFP2 minimum) - malachite dust is toxic when sanding
On the mica powder: The bronze-brown ground color comes from dark mica powder. No specific brand is required - a dark bronze or black-brown mica works. Load at approximately 2% by weight to start and adjust to your target shade. The ground needs to read dark and warm - the malachite veins need contrast to register against it. See the RCG resin coloring guide for mica loading guidance.
3. Setting Up the Mold
The panel is cast in a flat mold and released after full cure. Mold construction is straightforward but needs to be right before any resin goes in - a leaking mold or an uneven base creates problems that cost hours in the processing stage. I posted a short video showing how I build the mold: watch on Instagram.
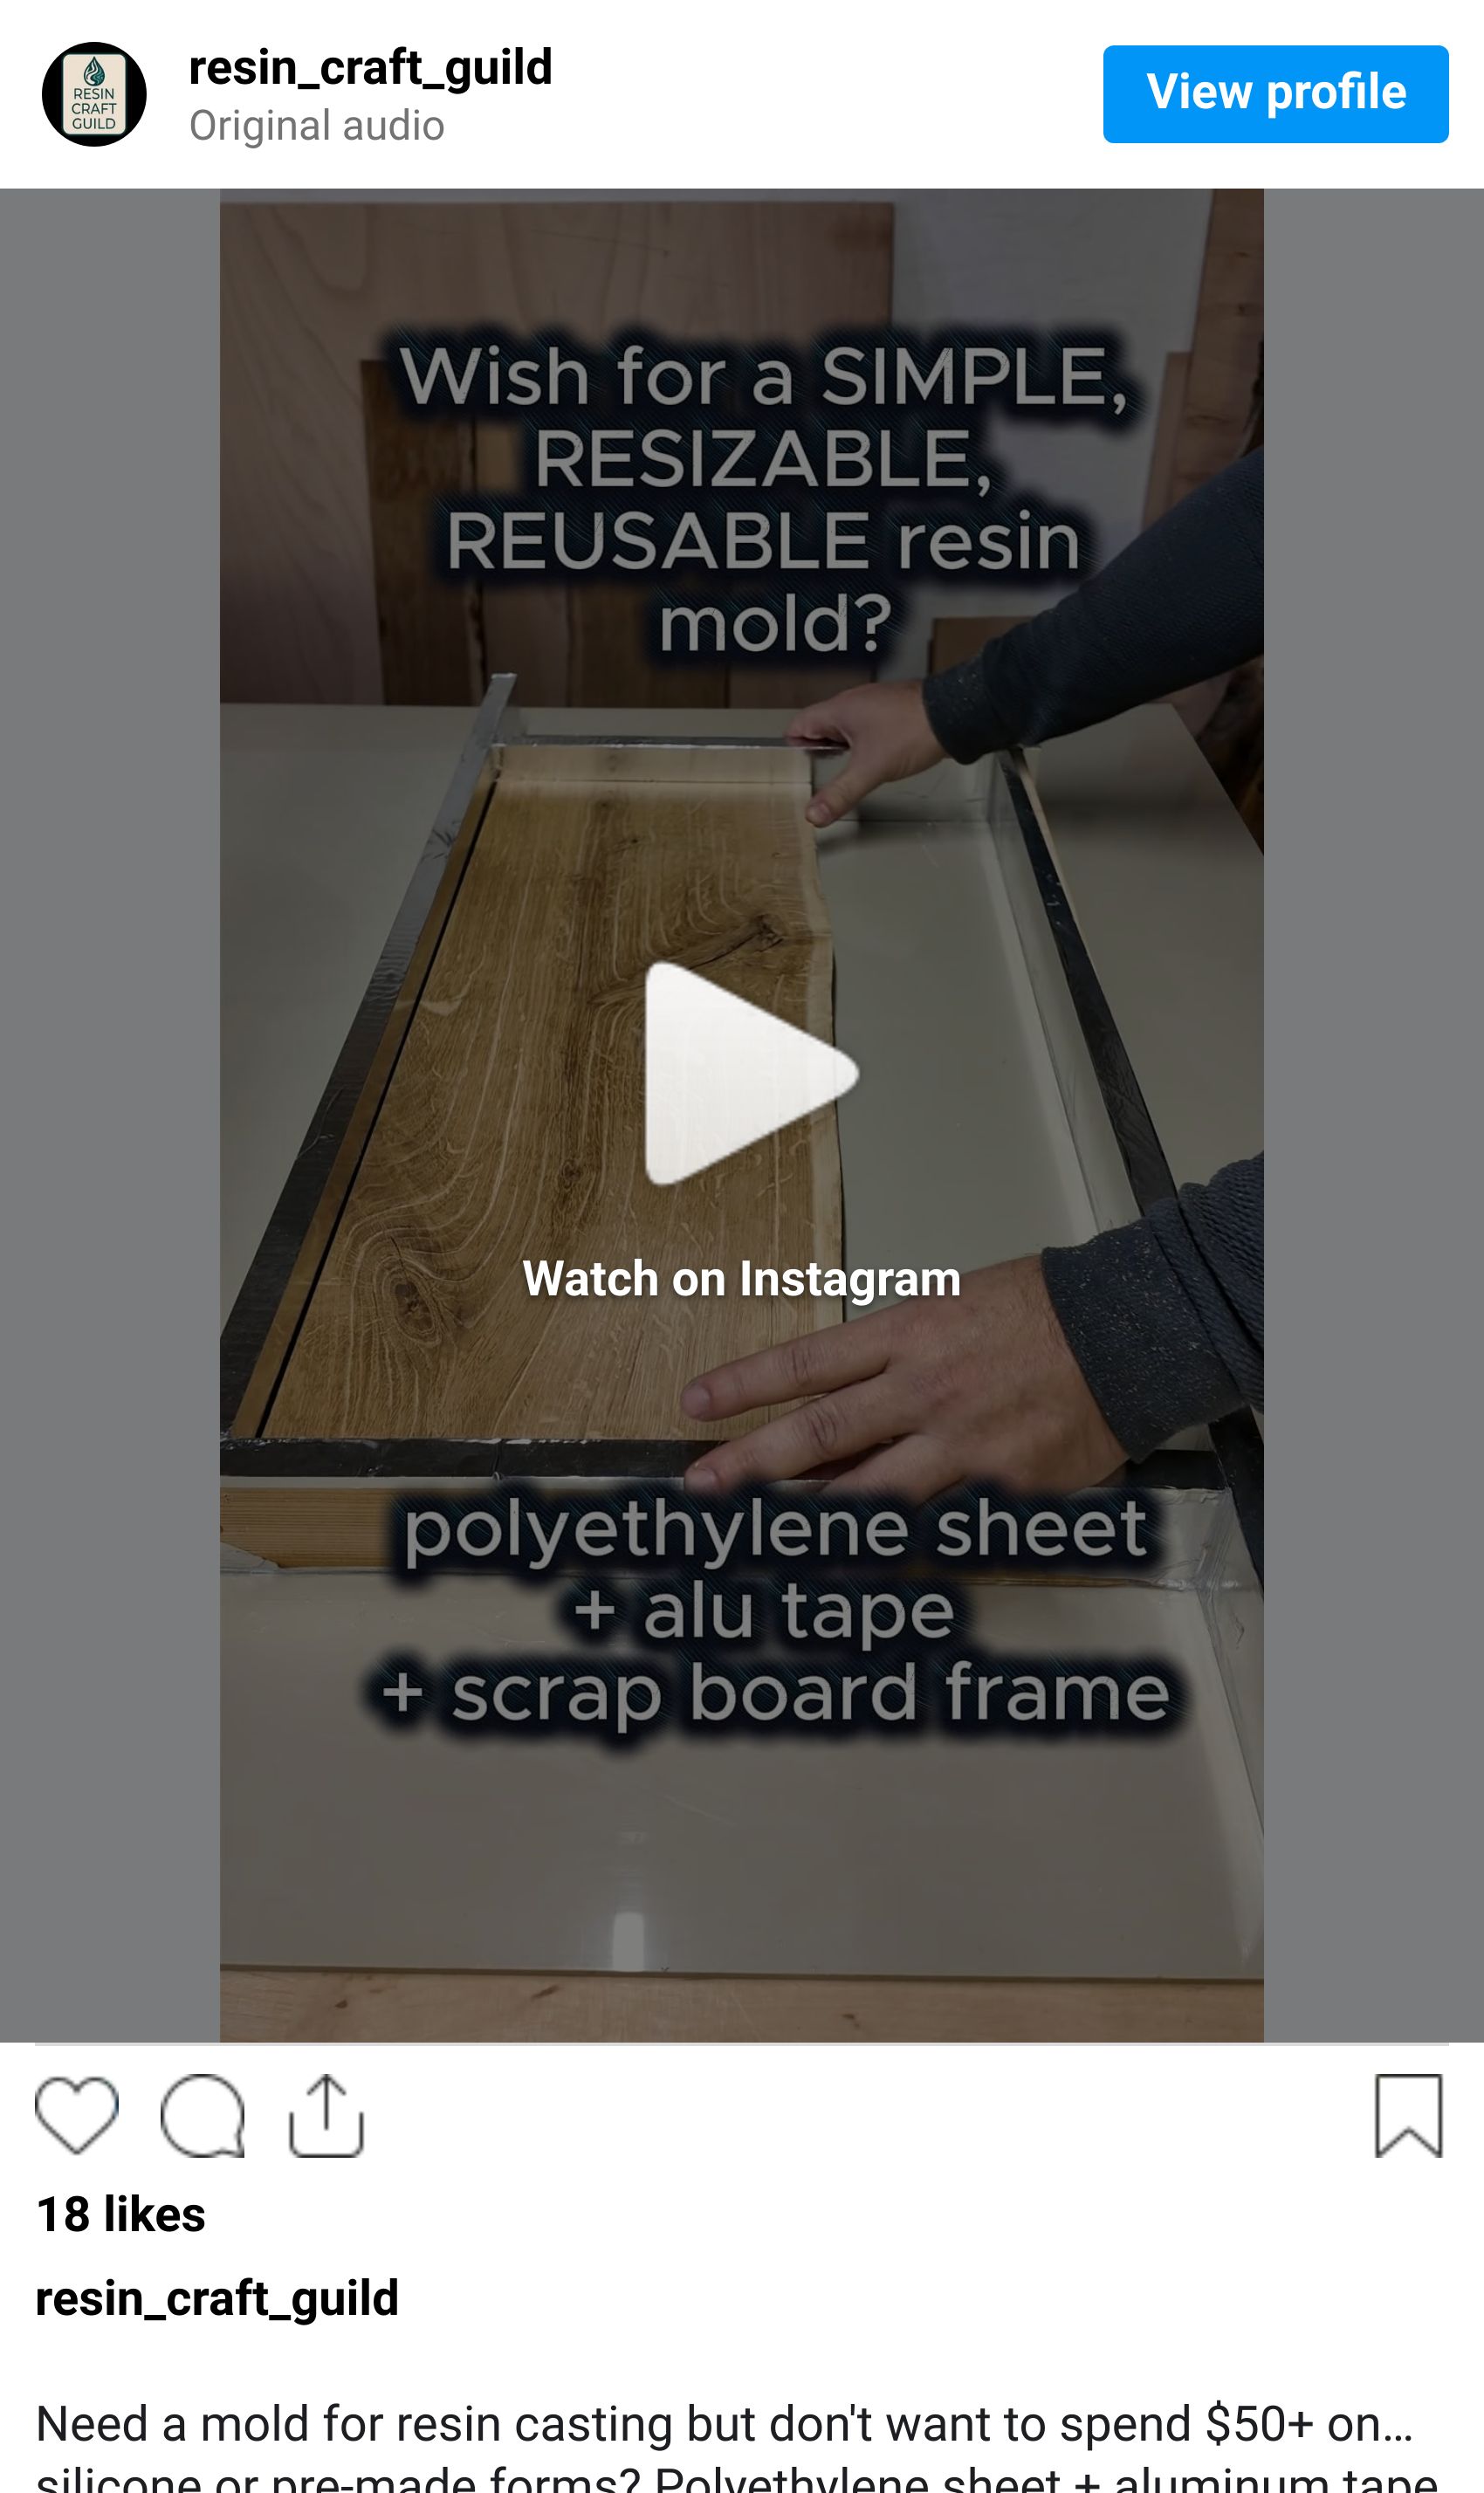
Building the mold
PE sheet as the base. Epoxy won't bond to polyethylene - the cured panel peels free cleanly.
Aluminum tape walls on all four sides. Press the tape firmly and overlap the corners. Any gap or lifted edge becomes a leak.
Run silicone sealant along every seam from both inside and outside - where wall meets base and where walls meet each other at corners. Let it cure fully - at least a few hours - before pouring anything.
Check level with a spirit level in both directions. An uneven base means an uneven casting. Fix it now.
Panel dimensions are your choice. The piece in the photos has an epoxy section approximately half the width of the joined board. If you're building this as a standalone panel, size it to your intended use.
4. The Base Pour - Building the Ground
Mix Artline Wood Pro at 3:1 by weight according to the manufacturer's ratio. Add dark bronze mica powder at approximately 2% by weight - start there and adjust if needed. The mixed color should look significantly darker than your target finished shade. Mica reads lighter once cured and sanded.
Pour a base layer approximately 2cm deep - roughly two thirds of the board thickness. Wood Pro handles up to 5-6cm per layer, so this is well within its range - no need to split into sub-layers. Pour slowly from one end and let the resin self-level across the mold. Watch the base pour on Instagram.
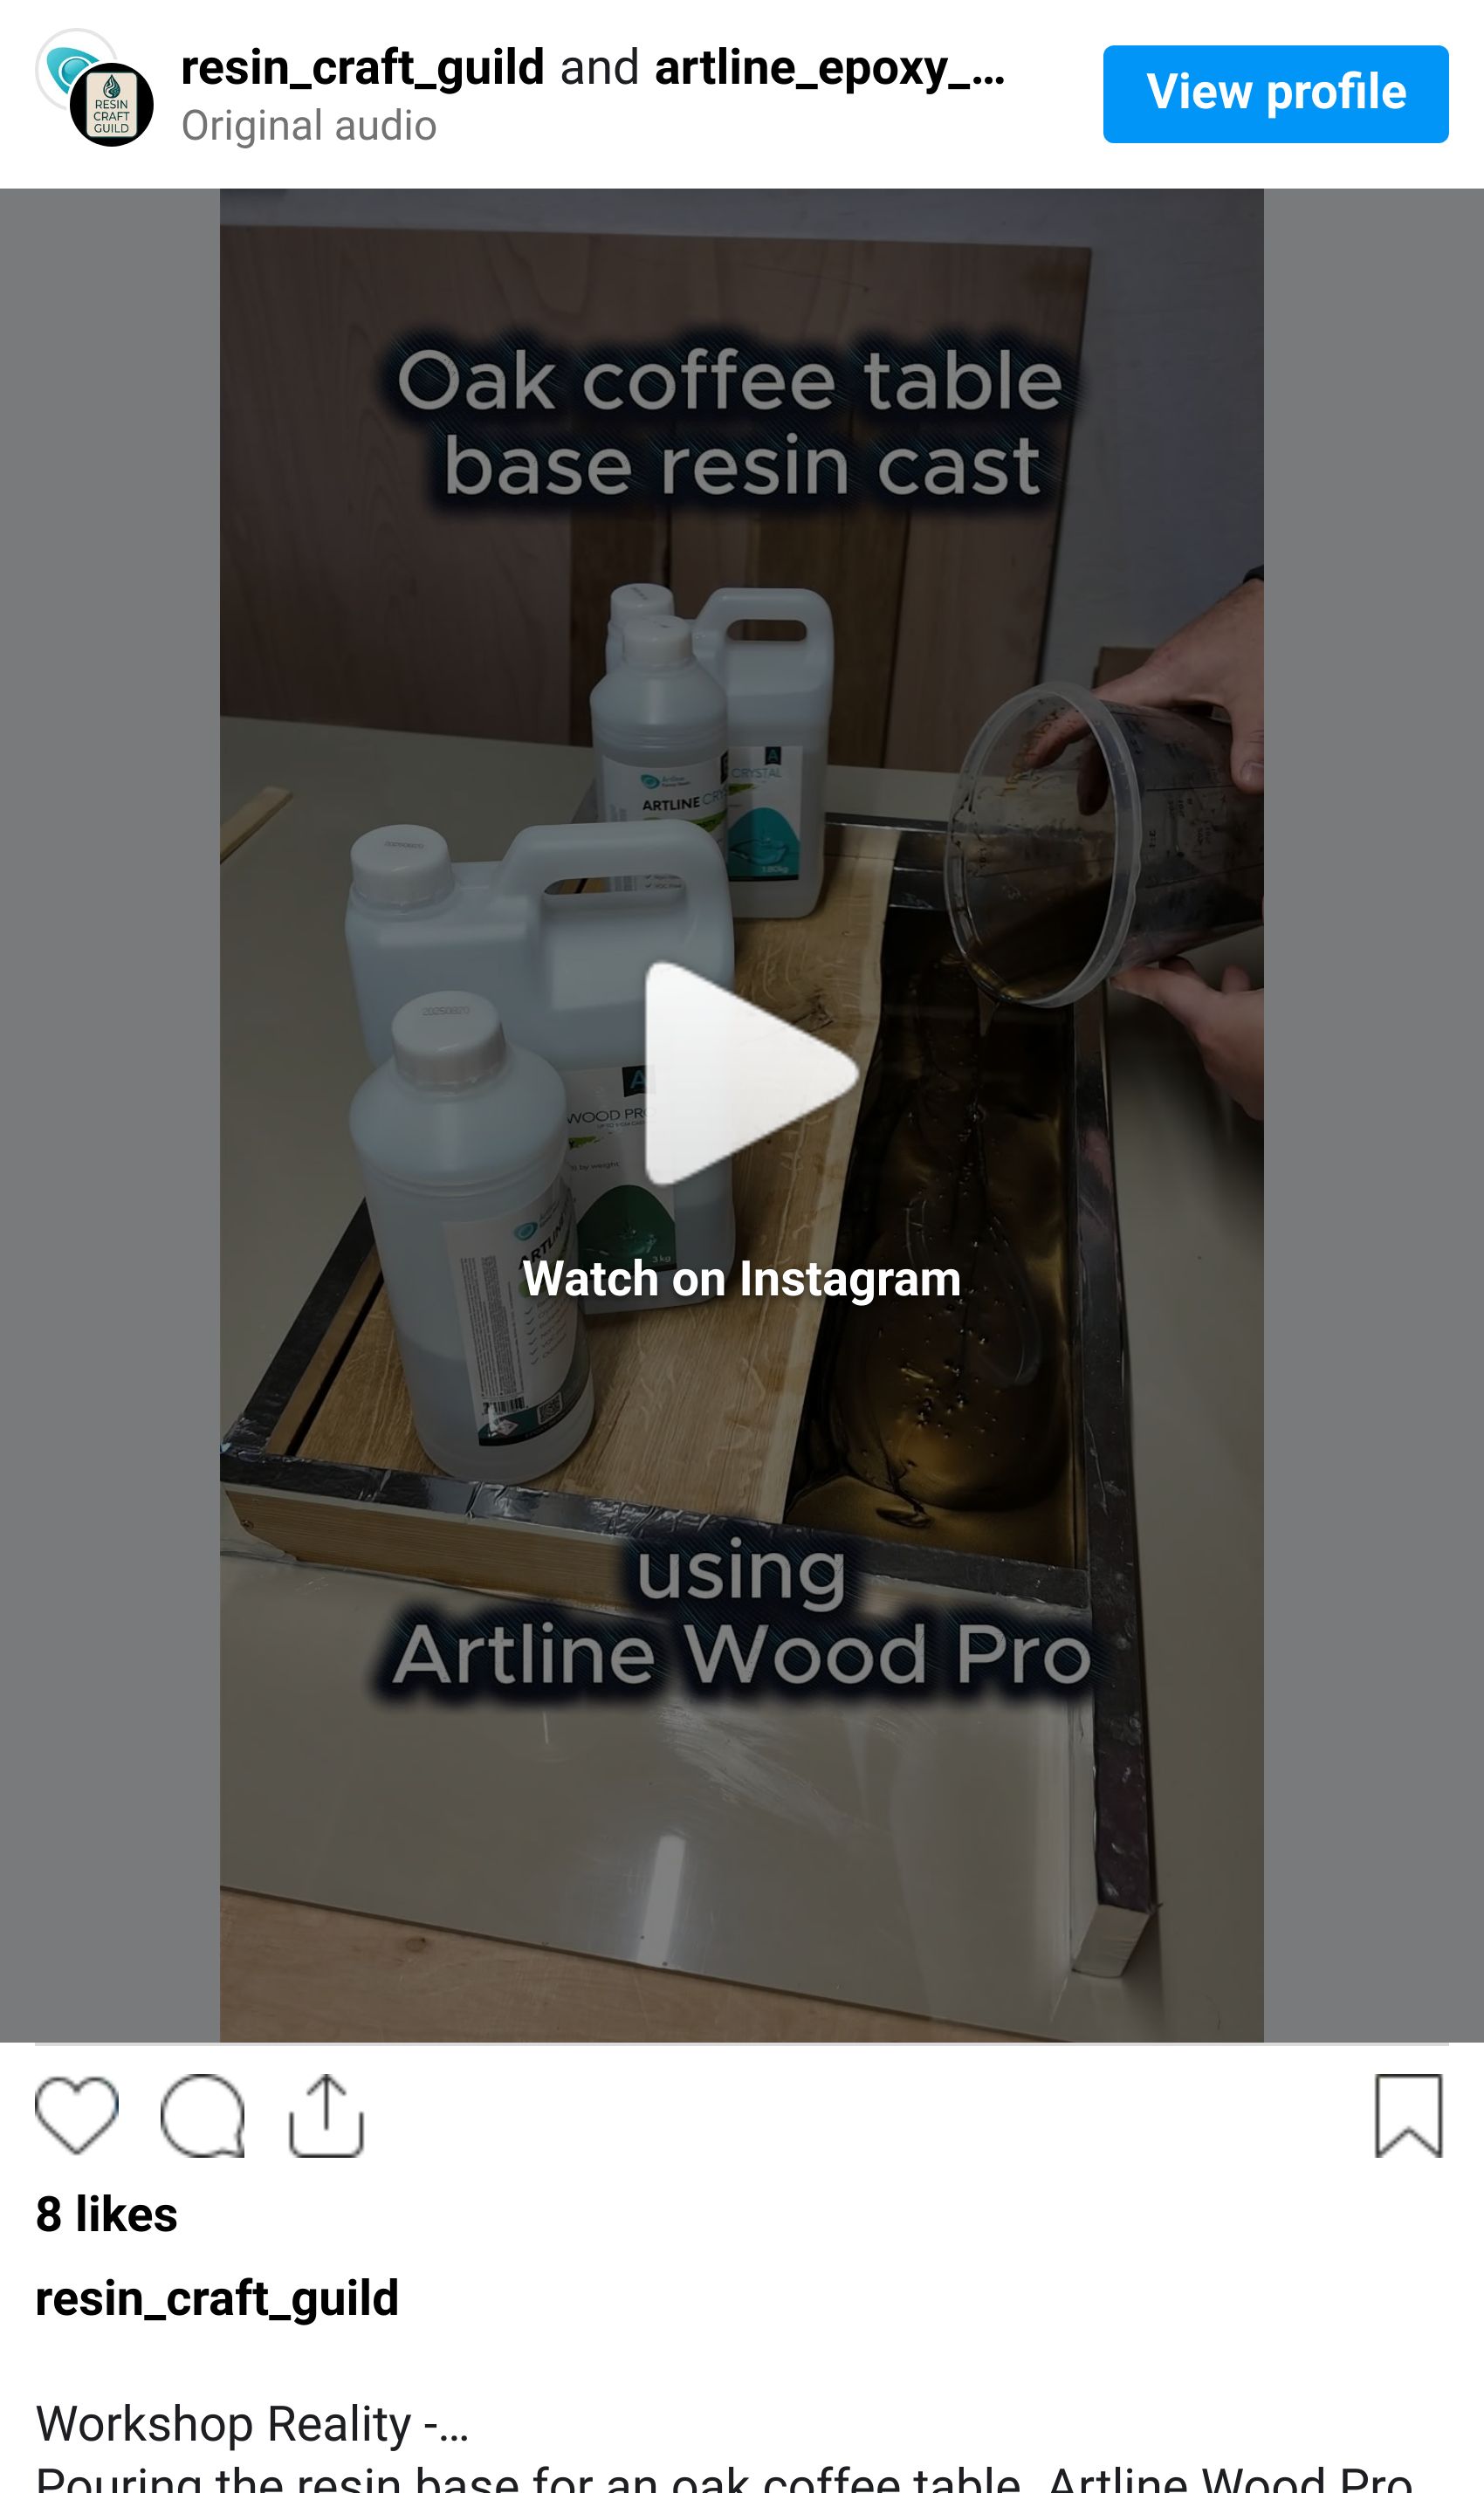
Pass a heat gun over the surface at 15-20cm distance to pop surface bubbles. Keep it moving.
Now wait. The base layer needs to reach partial cure before the next steps - firm enough to work on, still chemically active for the layers above. This is typically 8-16 hours depending on your resin and ambient temperature. Check your product's datasheet for the tacky stage window.
5. Setting the Malachite Stones into the Base Layer
Once the base is partially hardened, cut channels approximately 5mm deep into it following your planned vein paths. Use a sharp knife for narrow channels or a router for wider ones. These channels are where the malachite stones sit - recessed into the base layer so the finished veins have real depth rather than sitting on the surface. Watch this step on Instagram.
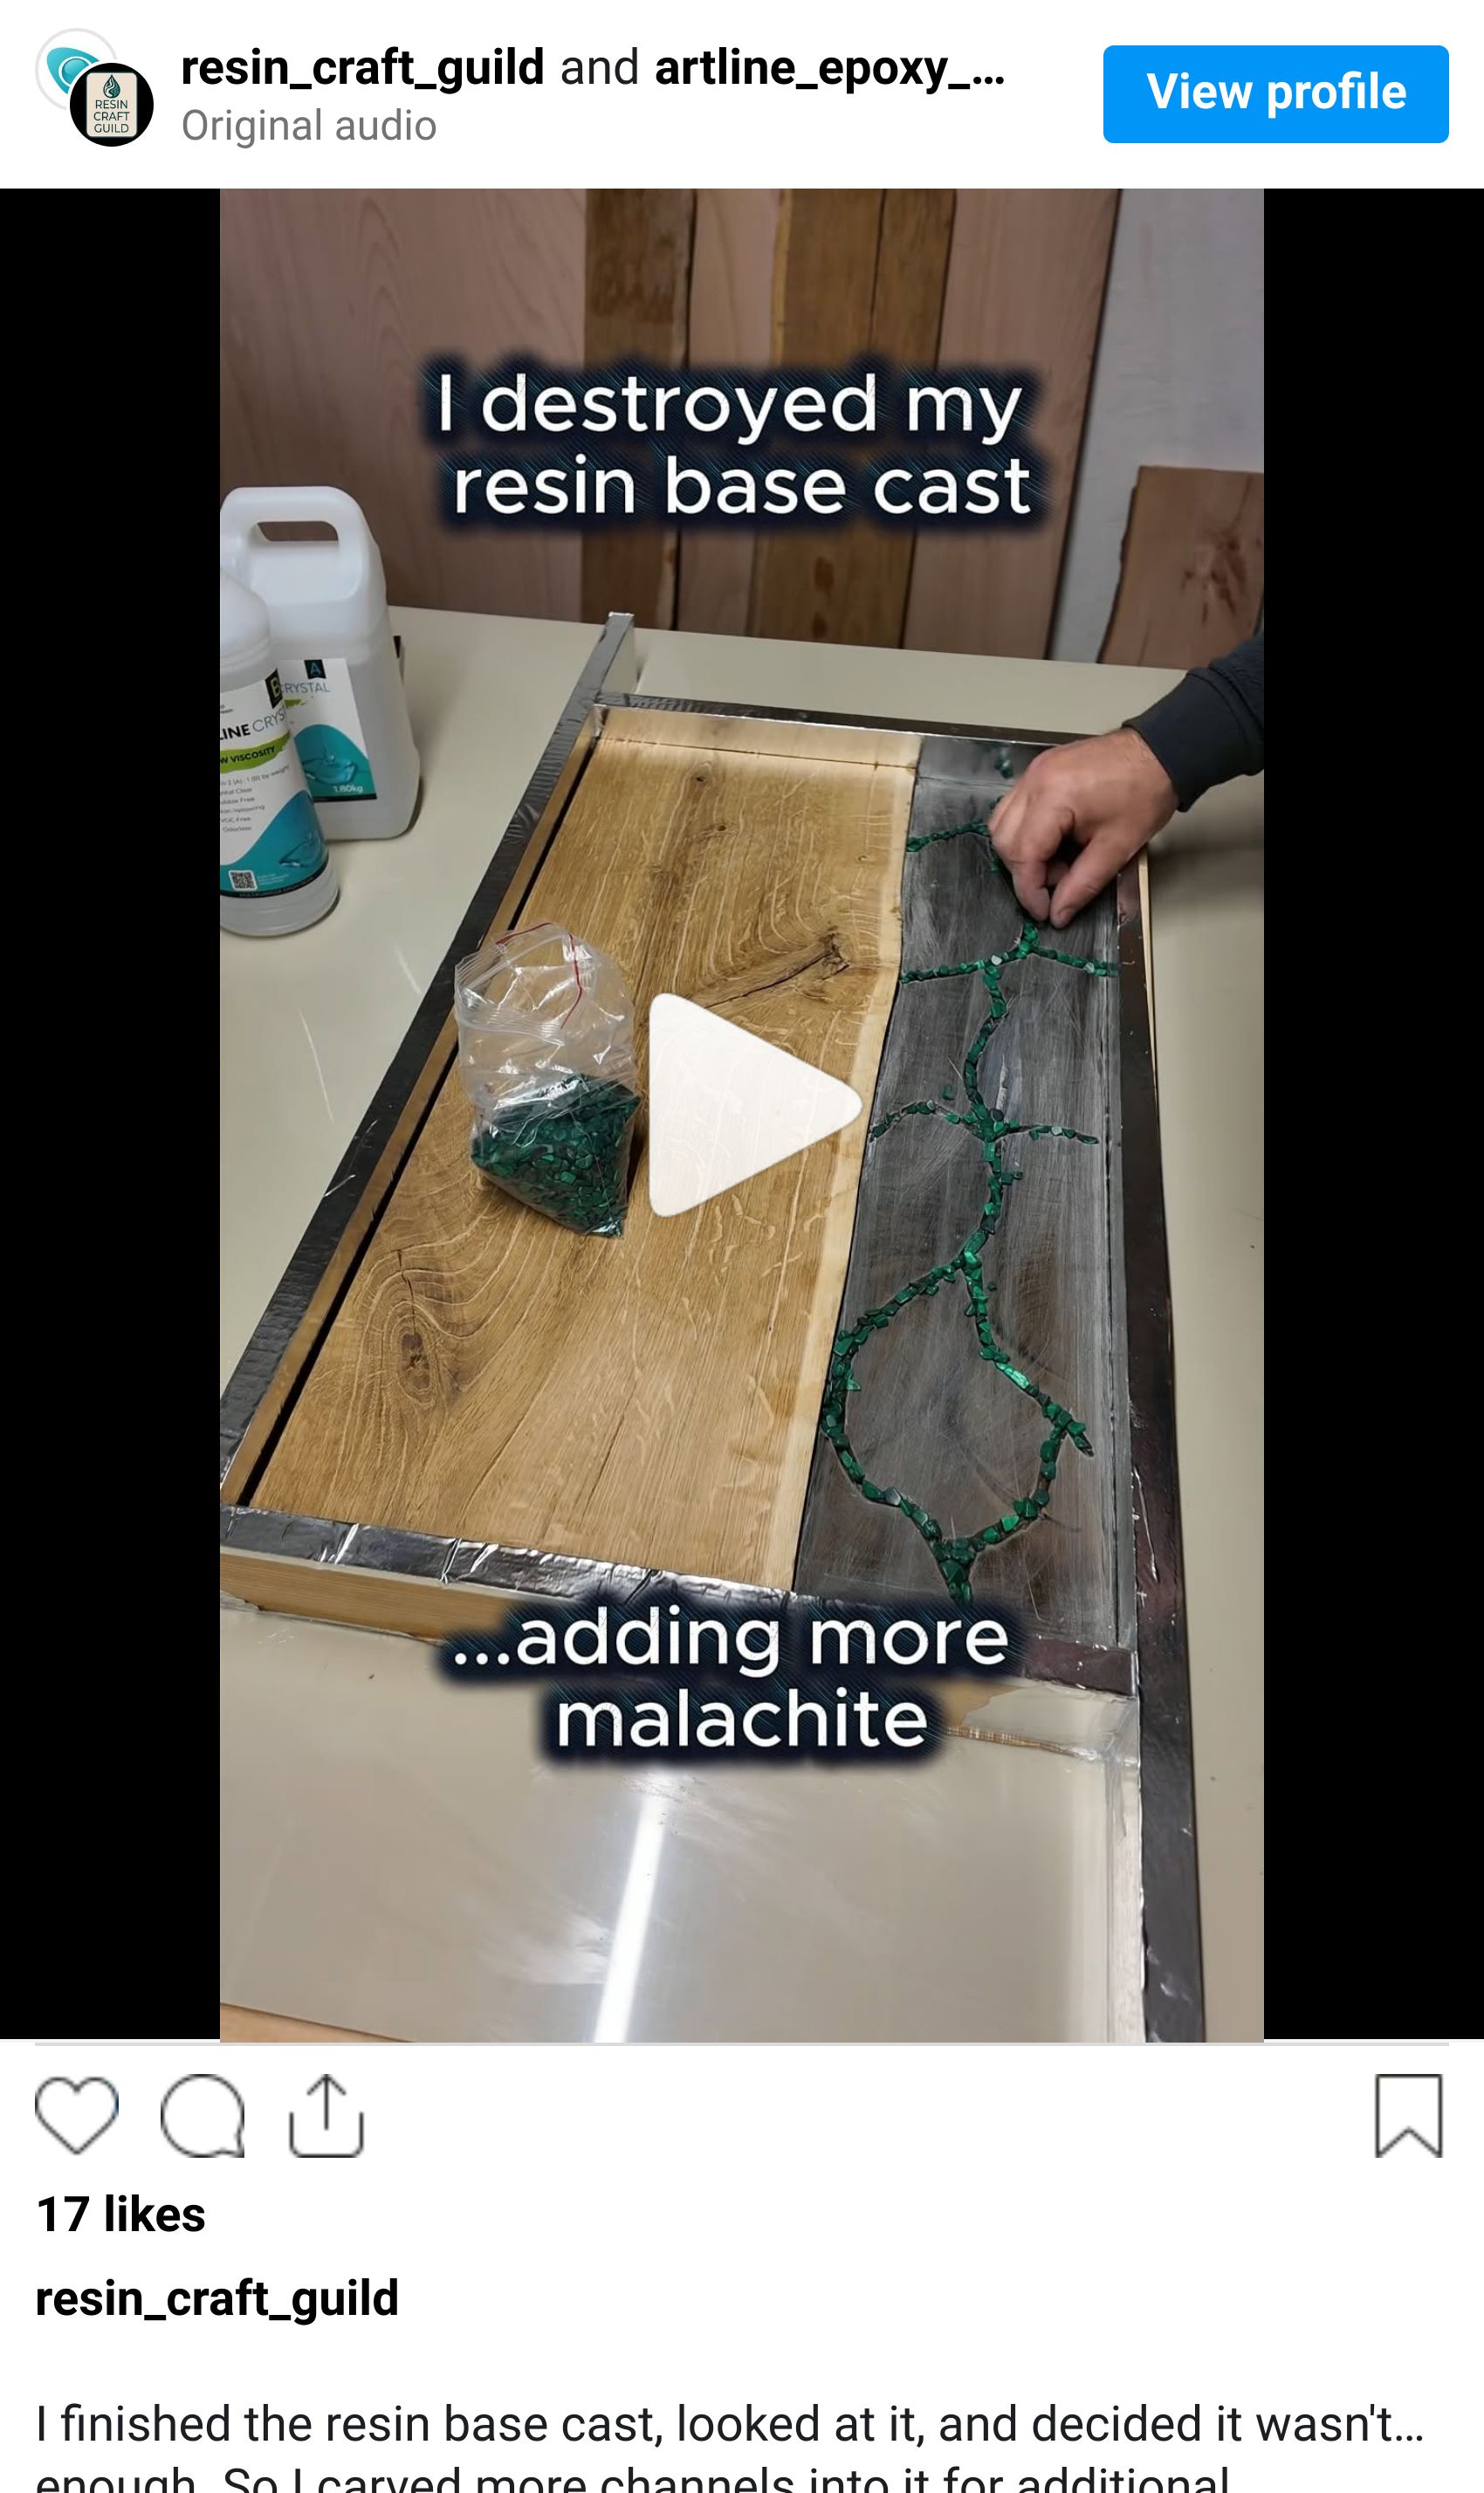
Place the malachite stones into the routed channels - larger stones first, finer material filling the gaps, same approach as the oak inlay in Part 1. Fix with a thin application of clear transparent resin. Allow to cure fully.
Once the stone fix has cured, sand the stones lightly to bring any proud material closer to flush. The clay walls will be built directly on top of and around the fixed malachite, so the surface needs to be reasonably flat for the walls to sit stably.
6. Building the Clay Walls
This is the technique that defines this piece, and the step that requires the most care. Watch this step on Instagram.
The logic
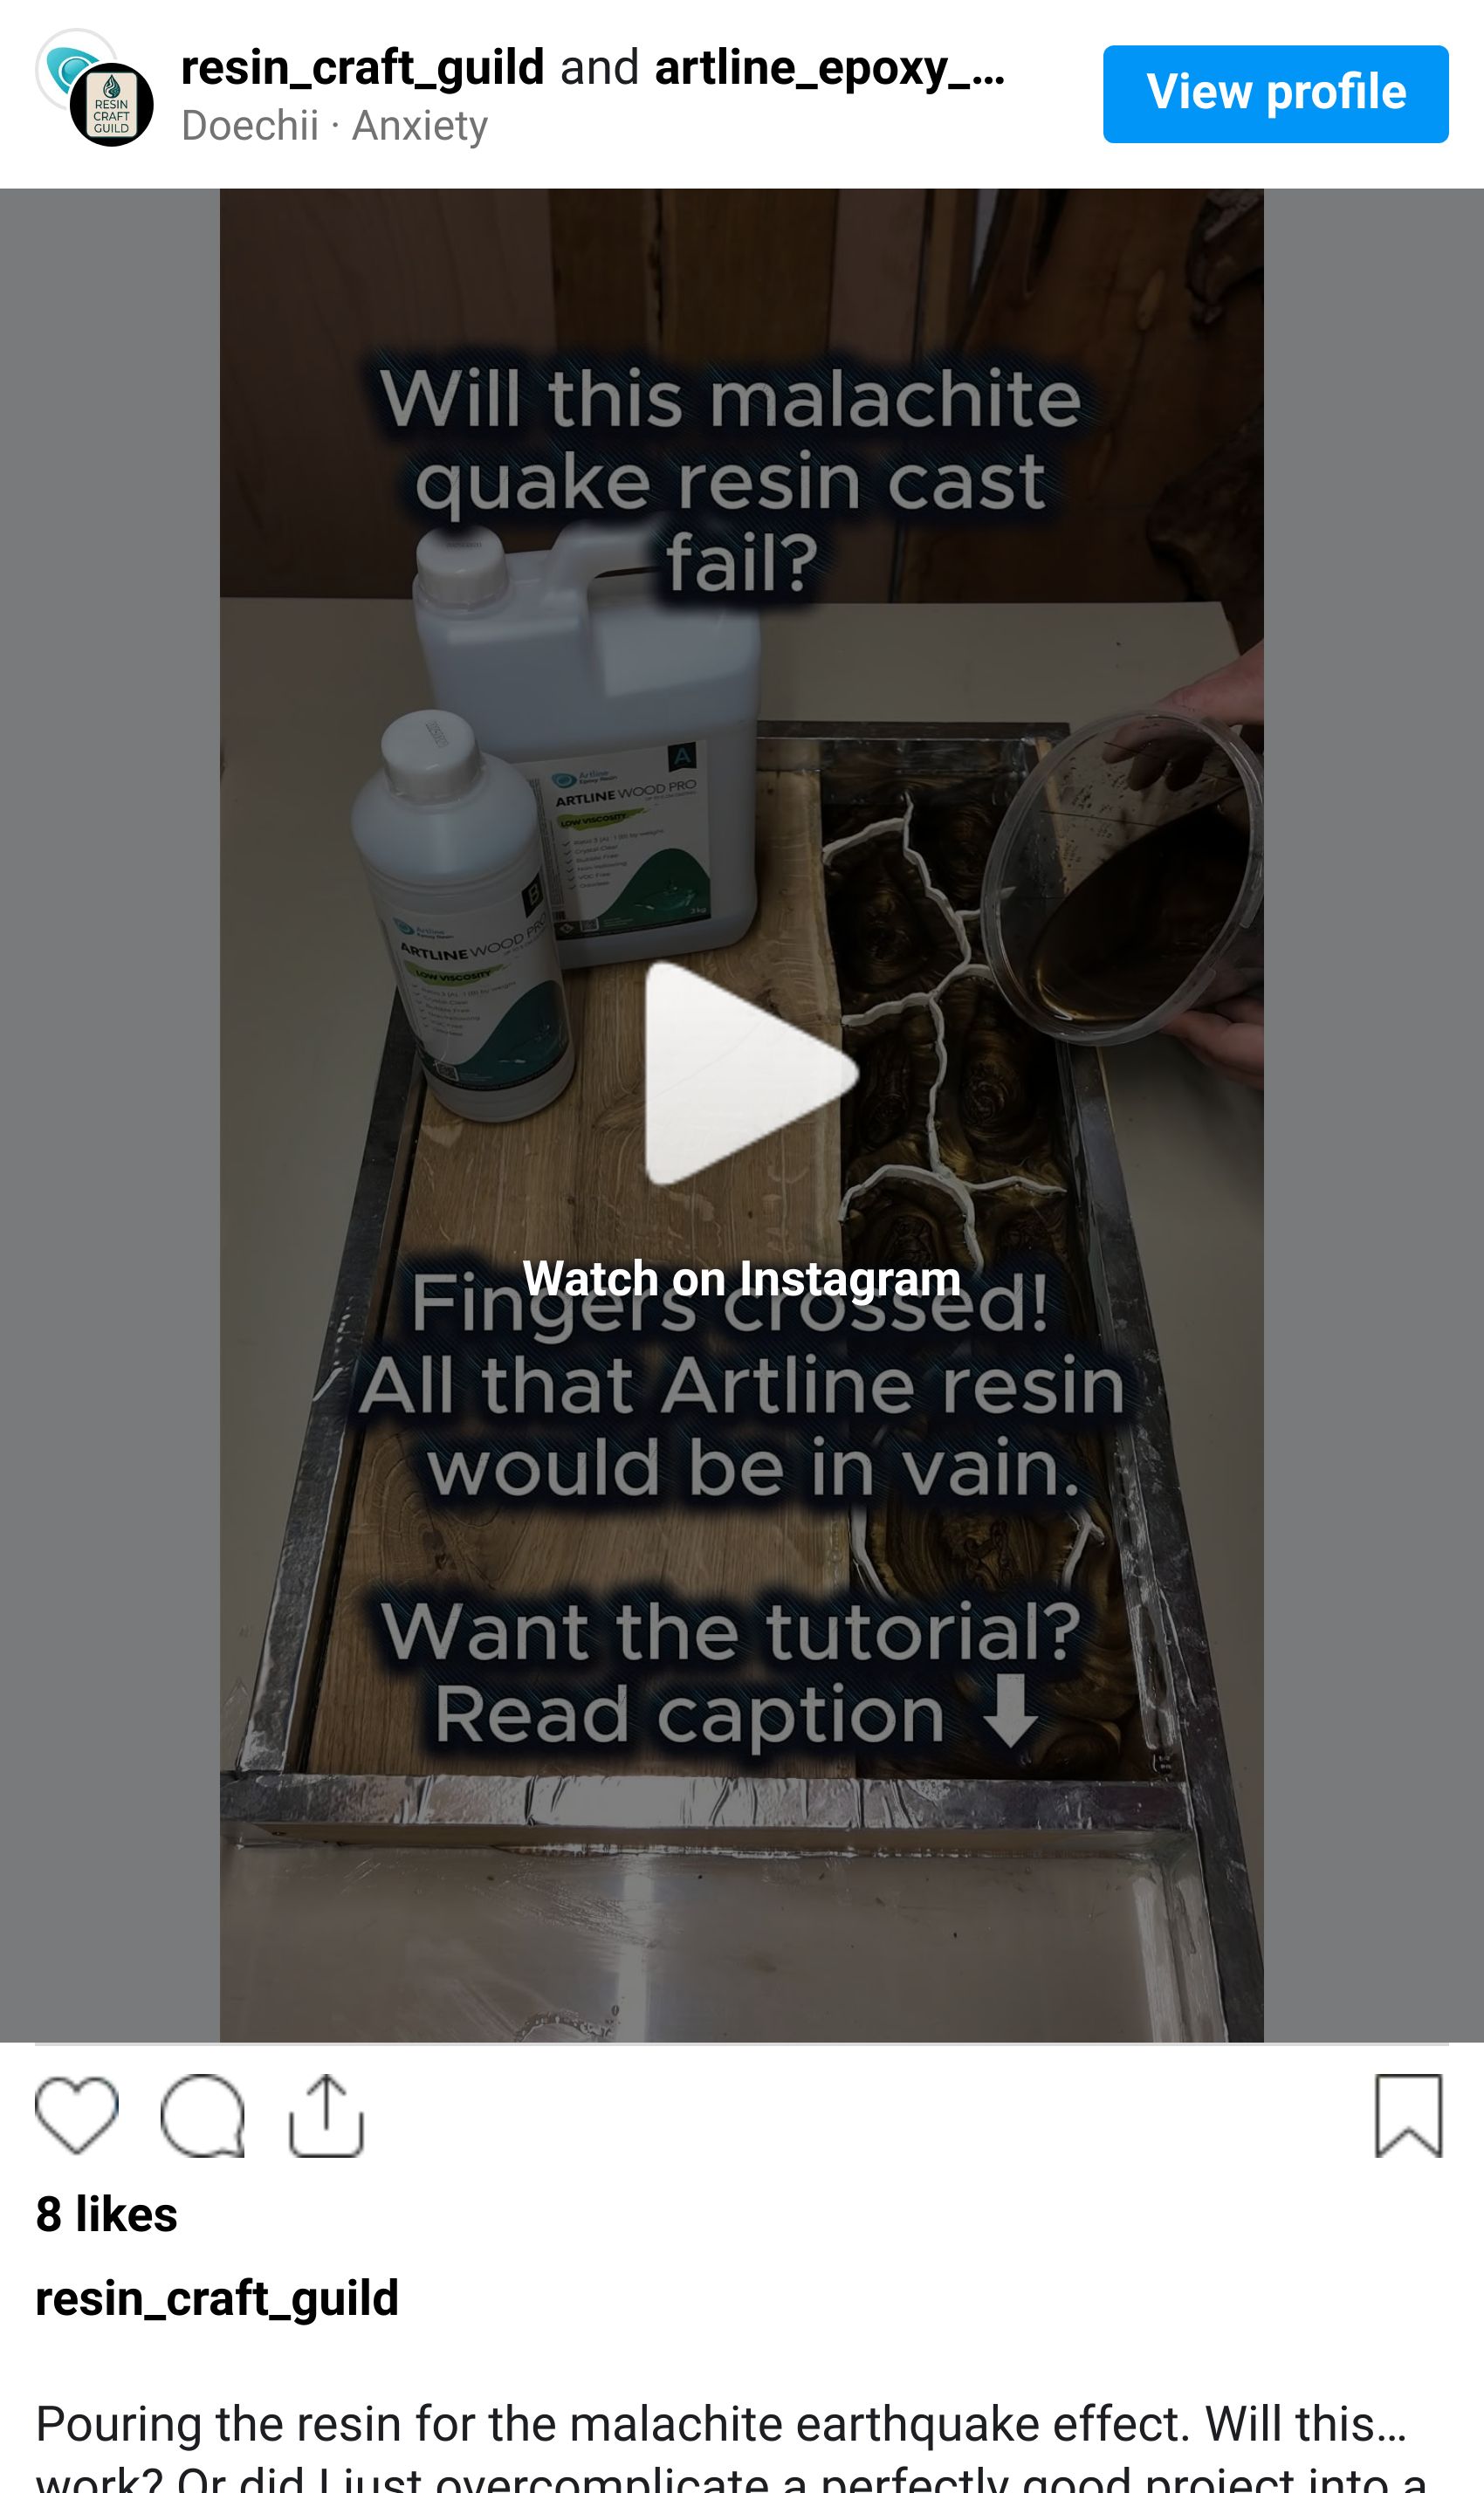
You build clay walls on the partially cured base layer following your planned vein paths - directly over and around the fixed malachite stones. You pour the second epoxy layer around them. When the second layer cures fully, you remove the clay - and the void the clay occupied becomes an open channel running through the top of the casting. Those channels expose the malachite stones below and are what you fill with transparent resin.
Building the walls
Use air-dry modeling clay. Work it until pliable. Roll it into ropes approximately 3-4mm in diameter. Pressed gently onto the base surface, these give you walls 1-2mm thick.
Press the clay ropes onto the partially cured base following your vein paths. Work out the design as you go - the clay is repositionable at this stage. The vein paths on this piece use a branching pattern: wider main channels that fork into narrower offshoots. Keep wall height consistent - aim for slightly above 1cm, a few millimetres proud of the second pour level. This is important: walls that are too low get submerged and the epoxy flows over them into the channel space before it cures.
Once positioned, let the clay dry. Air-dry clay stiffens as it loses moisture - this gives the walls enough rigidity to hold their shape under the silicone coating and the pour. Once dry, carefully lift each wall section and coat the outer surfaces and the underside with silicone sealant - but keep it off the base layer. Silicone on the base layer would prevent the second pour from bonding properly. Work section by section: lift, coat, set back down. Work it in with your fingers - a brush won't get proper coverage on the clay surface. Wear gloves for this step, silicone is stubborn to get off skin. This is the step most people skip and then regret. The silicone creates a barrier between the clay and the curing epoxy for two reasons: it prevents the clay surface bonding into the channel wall making removal much harder, and it guards against the resin partially dissolving the clay surface - which causes cloudiness in the epoxy around the channel. Both problems are avoided with one step.
Let the silicone cure fully before the next step.
❝ The clay wall idea is straightforward in principle. Getting the clay out afterward is where it gets tedious. I used a screwdriver to work it free section by section - it came out, but slowly. The silicone coating helped significantly compared to an uncoated test I ran earlier. I'm still looking for a better release material for future versions - something that holds its shape under the pour and releases in one clean piece. If you have a solution that works, share it.
7. The Second Pour
With clay walls positioned and silicone fully cured, mix the second pour of brown mica epoxy - same color formula as the base layer. If you have a vacuum chamber, degas the mixed batch for 10 minutes before pouring - I did this for the top layer and it made a visible difference in surface quality.
Before pouring, run a thin bead of silicone sealant along the oak board edge - it sticks as it comes out of the tube and forms a small dam to contain the resin and prevent it running onto the wood surface. Let it cure before pouring.
Pour it slowly around and over the clay walls. Due to resin shrink factor, overfill by approximately 1mm above the board face level - the resin will pull back slightly as it cures.
Allow to cure fully - minimum 24-48 hours.
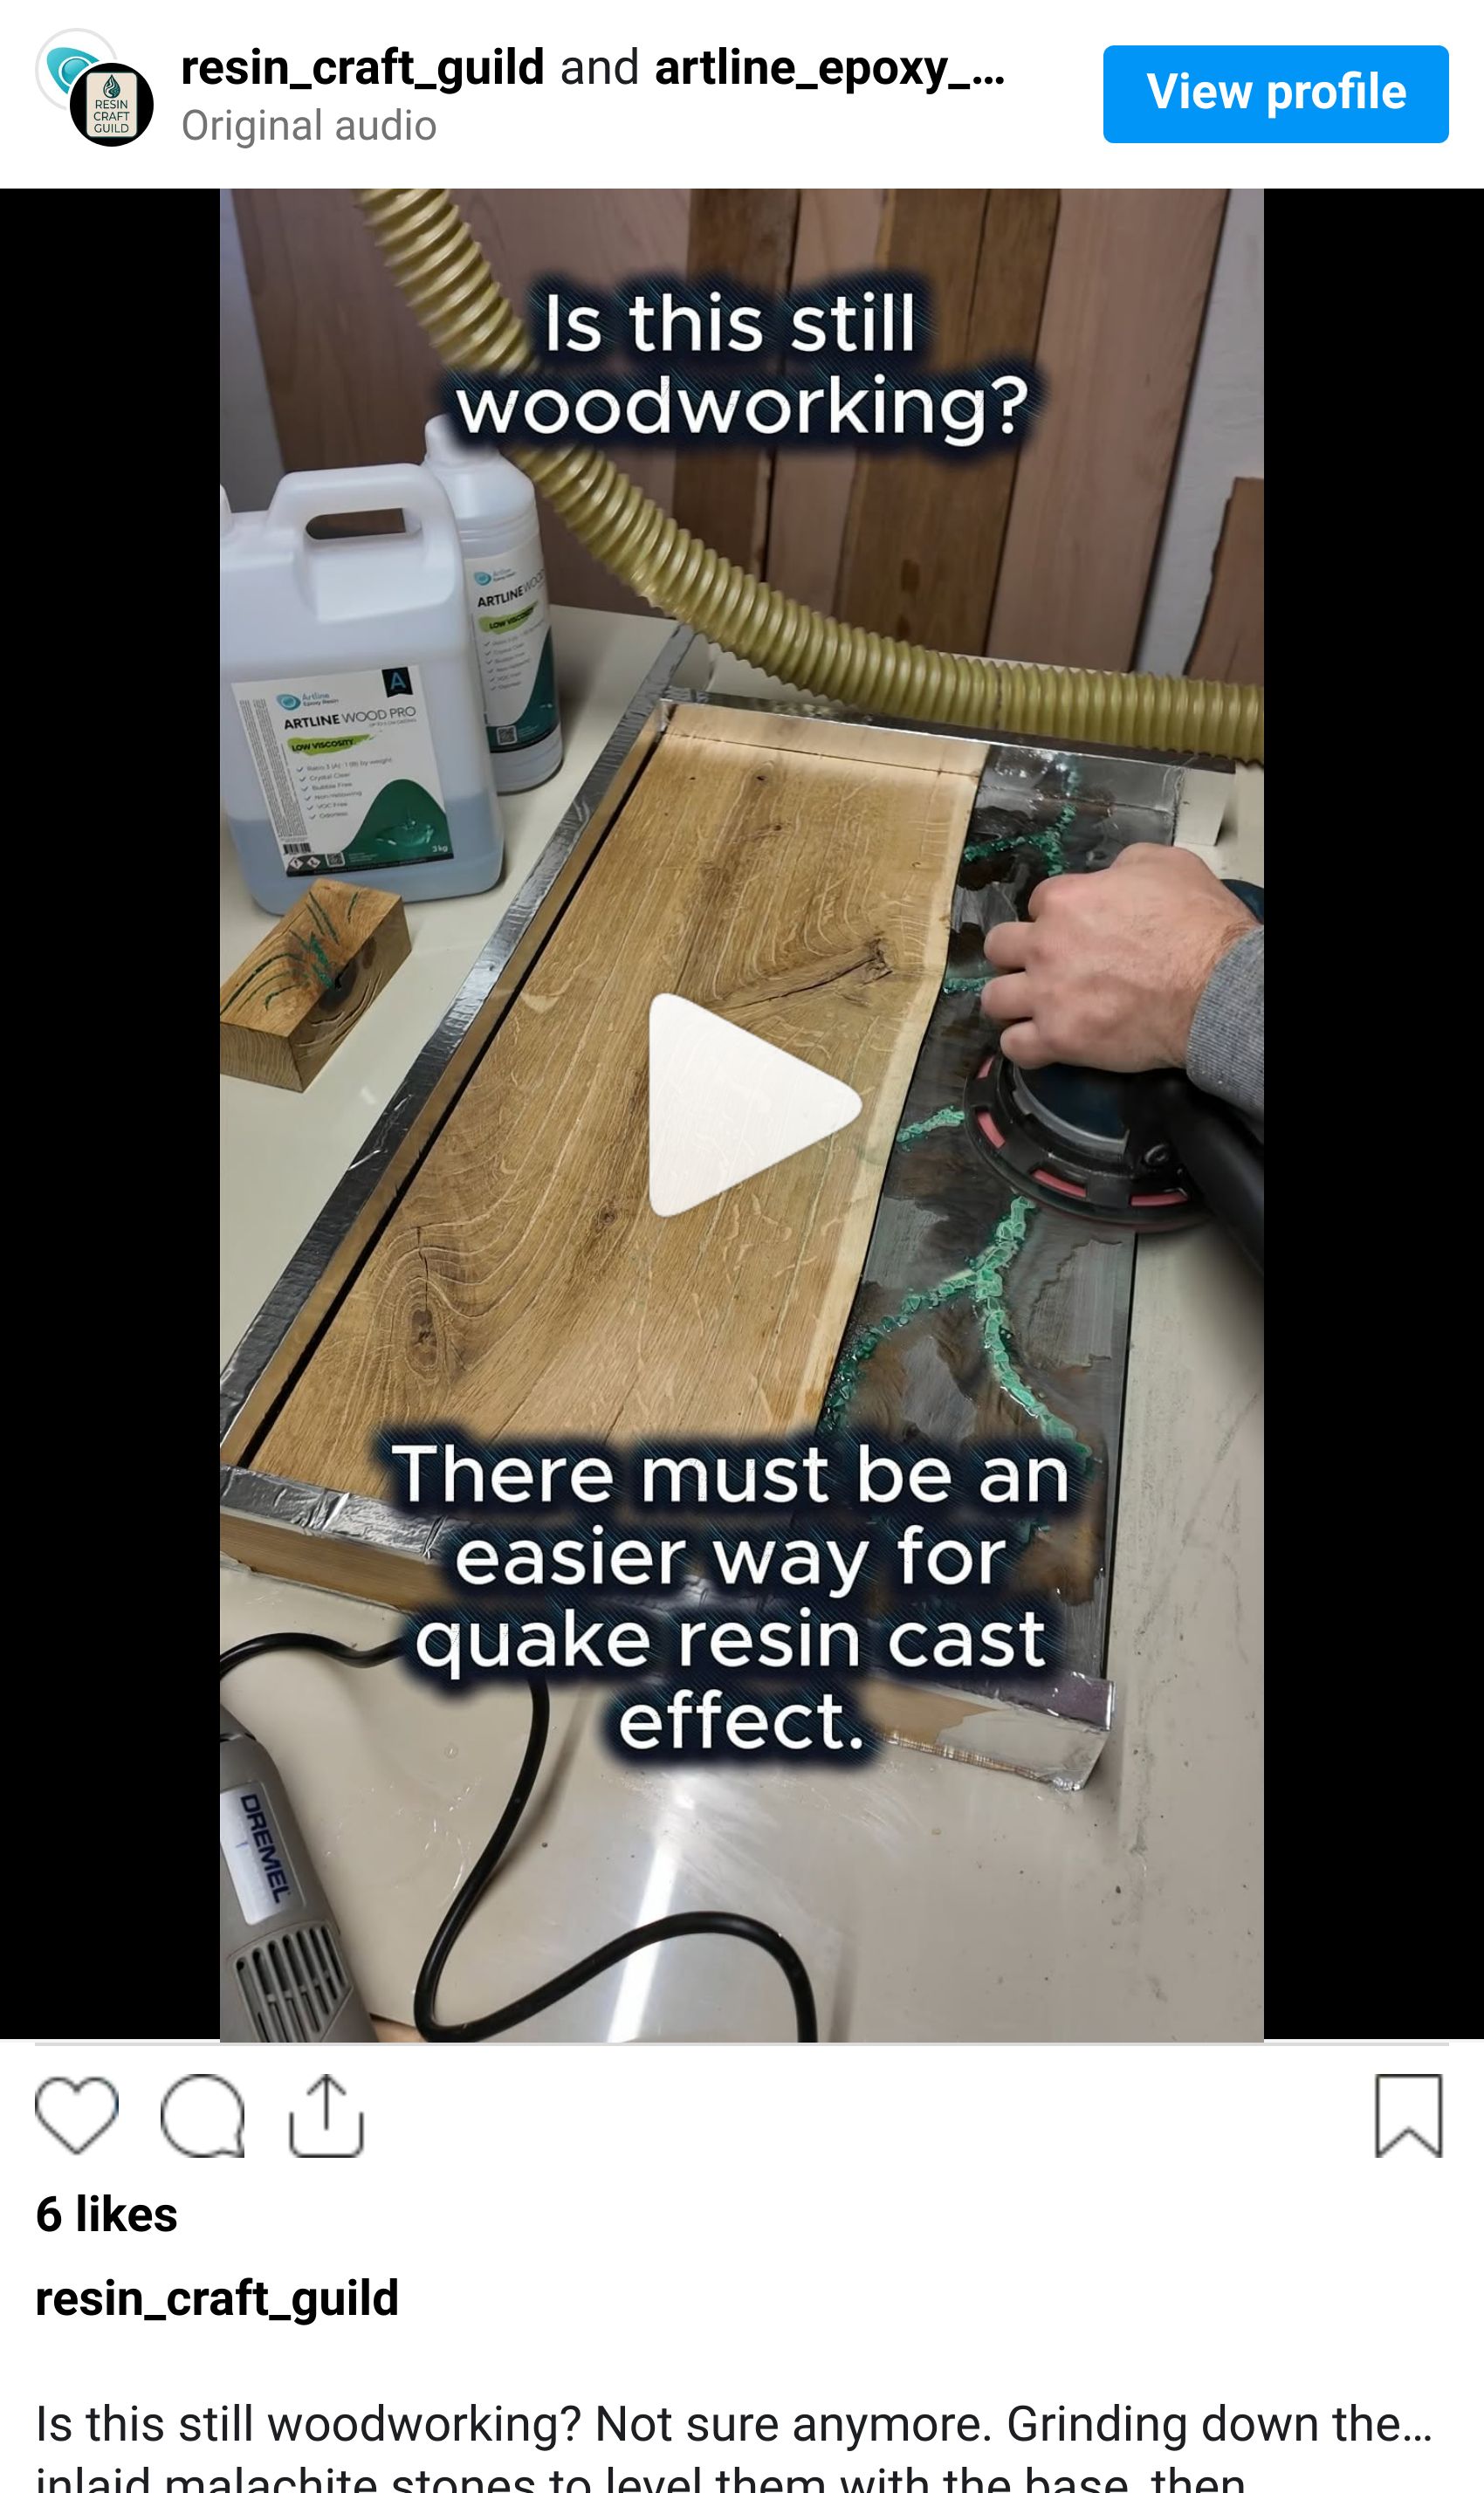
8. Removing the Clay, Cleaning and Final Shaping of the Channels
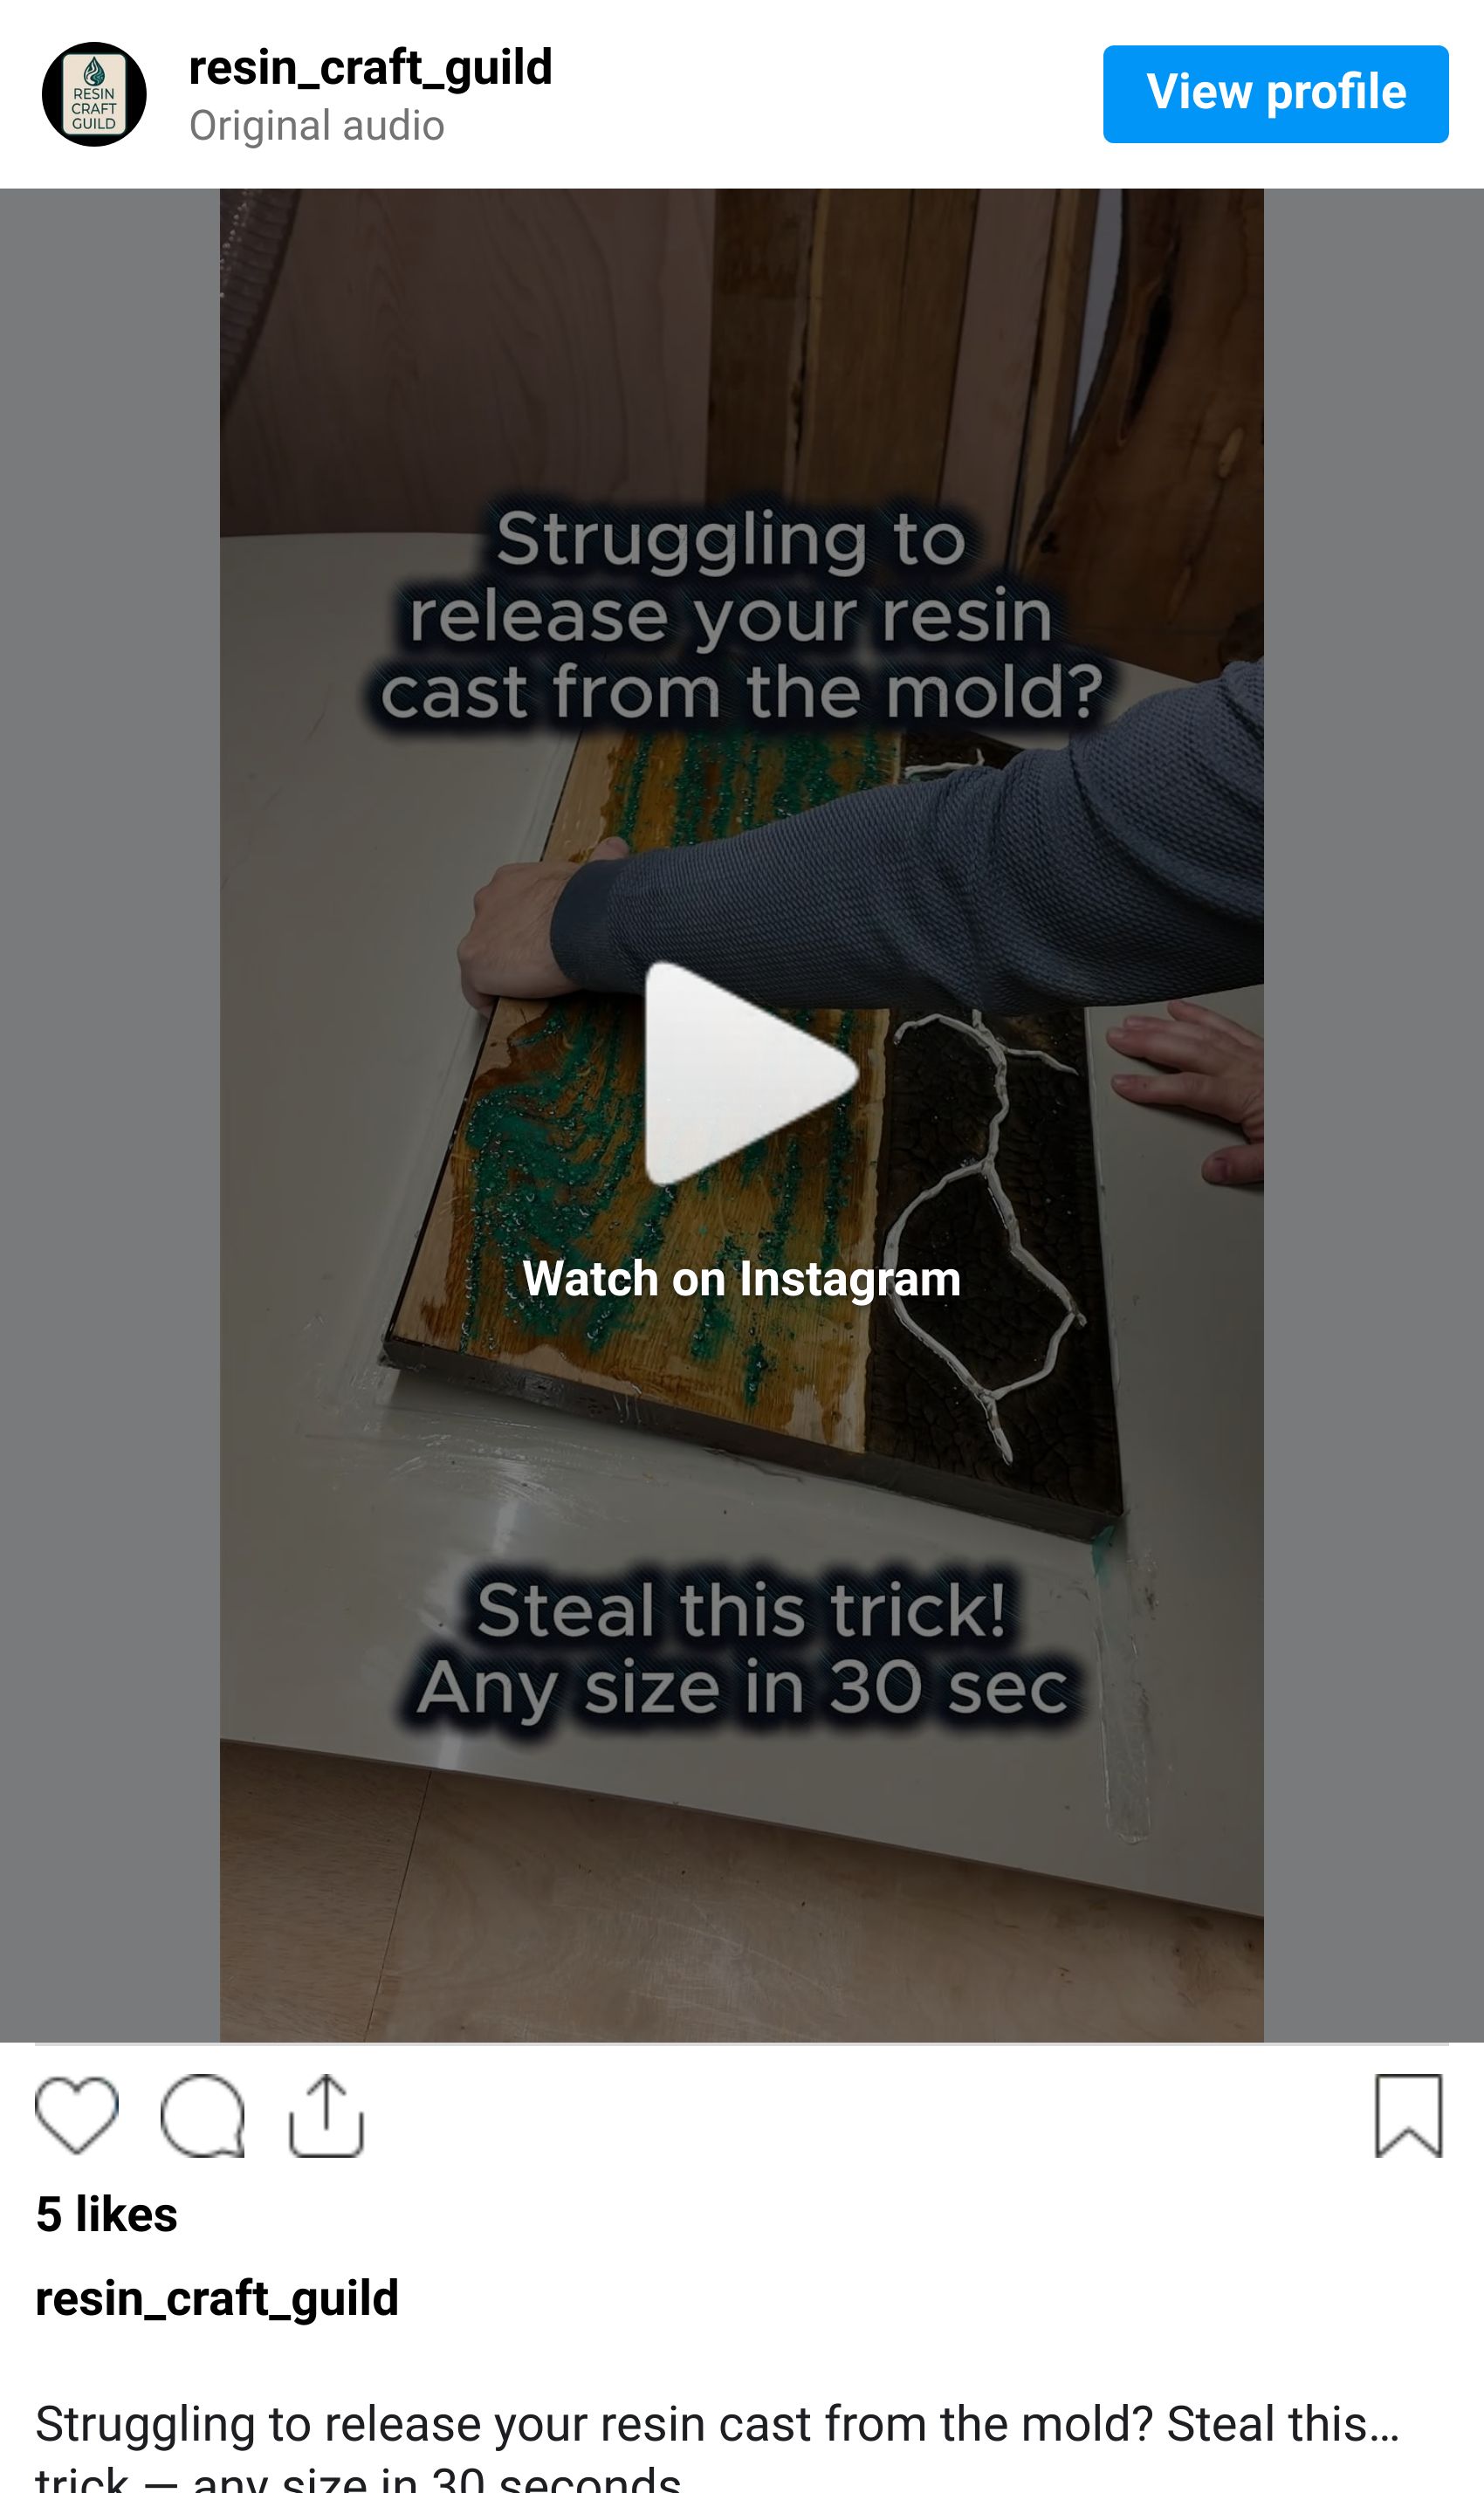
The second layer has cured. The clay walls are now buried - their shape is an inverted channel running through the top of the casting, filled with clay you need to remove.
Removing the clay
Use a screwdriver to work the clay free. Start at one end of a channel and work along it systematically. The clay comes out in sections, not in one piece. The silicone coating reduces bonding, but it doesn't eliminate resistance entirely - expect to spend time on this step.
Take your time. Rushing causes the screwdriver to slip and gouge the epoxy channel walls. A gouged wall shows through the transparent fill.
On narrower channels, a wooden skewer or similar thin tool reaches where a screwdriver can't.
Cleaning the channels
Once all clay is out, clean every channel thoroughly. Remove every fragment. Use a stiff brush to work along the channel base and walls. Any clay residue left in the channel will cloud the transparent resin fill - the cloudiness reads as a haze behind the malachite stones, which kills the visual depth you're working toward.
Blow out the channels with compressed air after brushing.
Shaping the channels
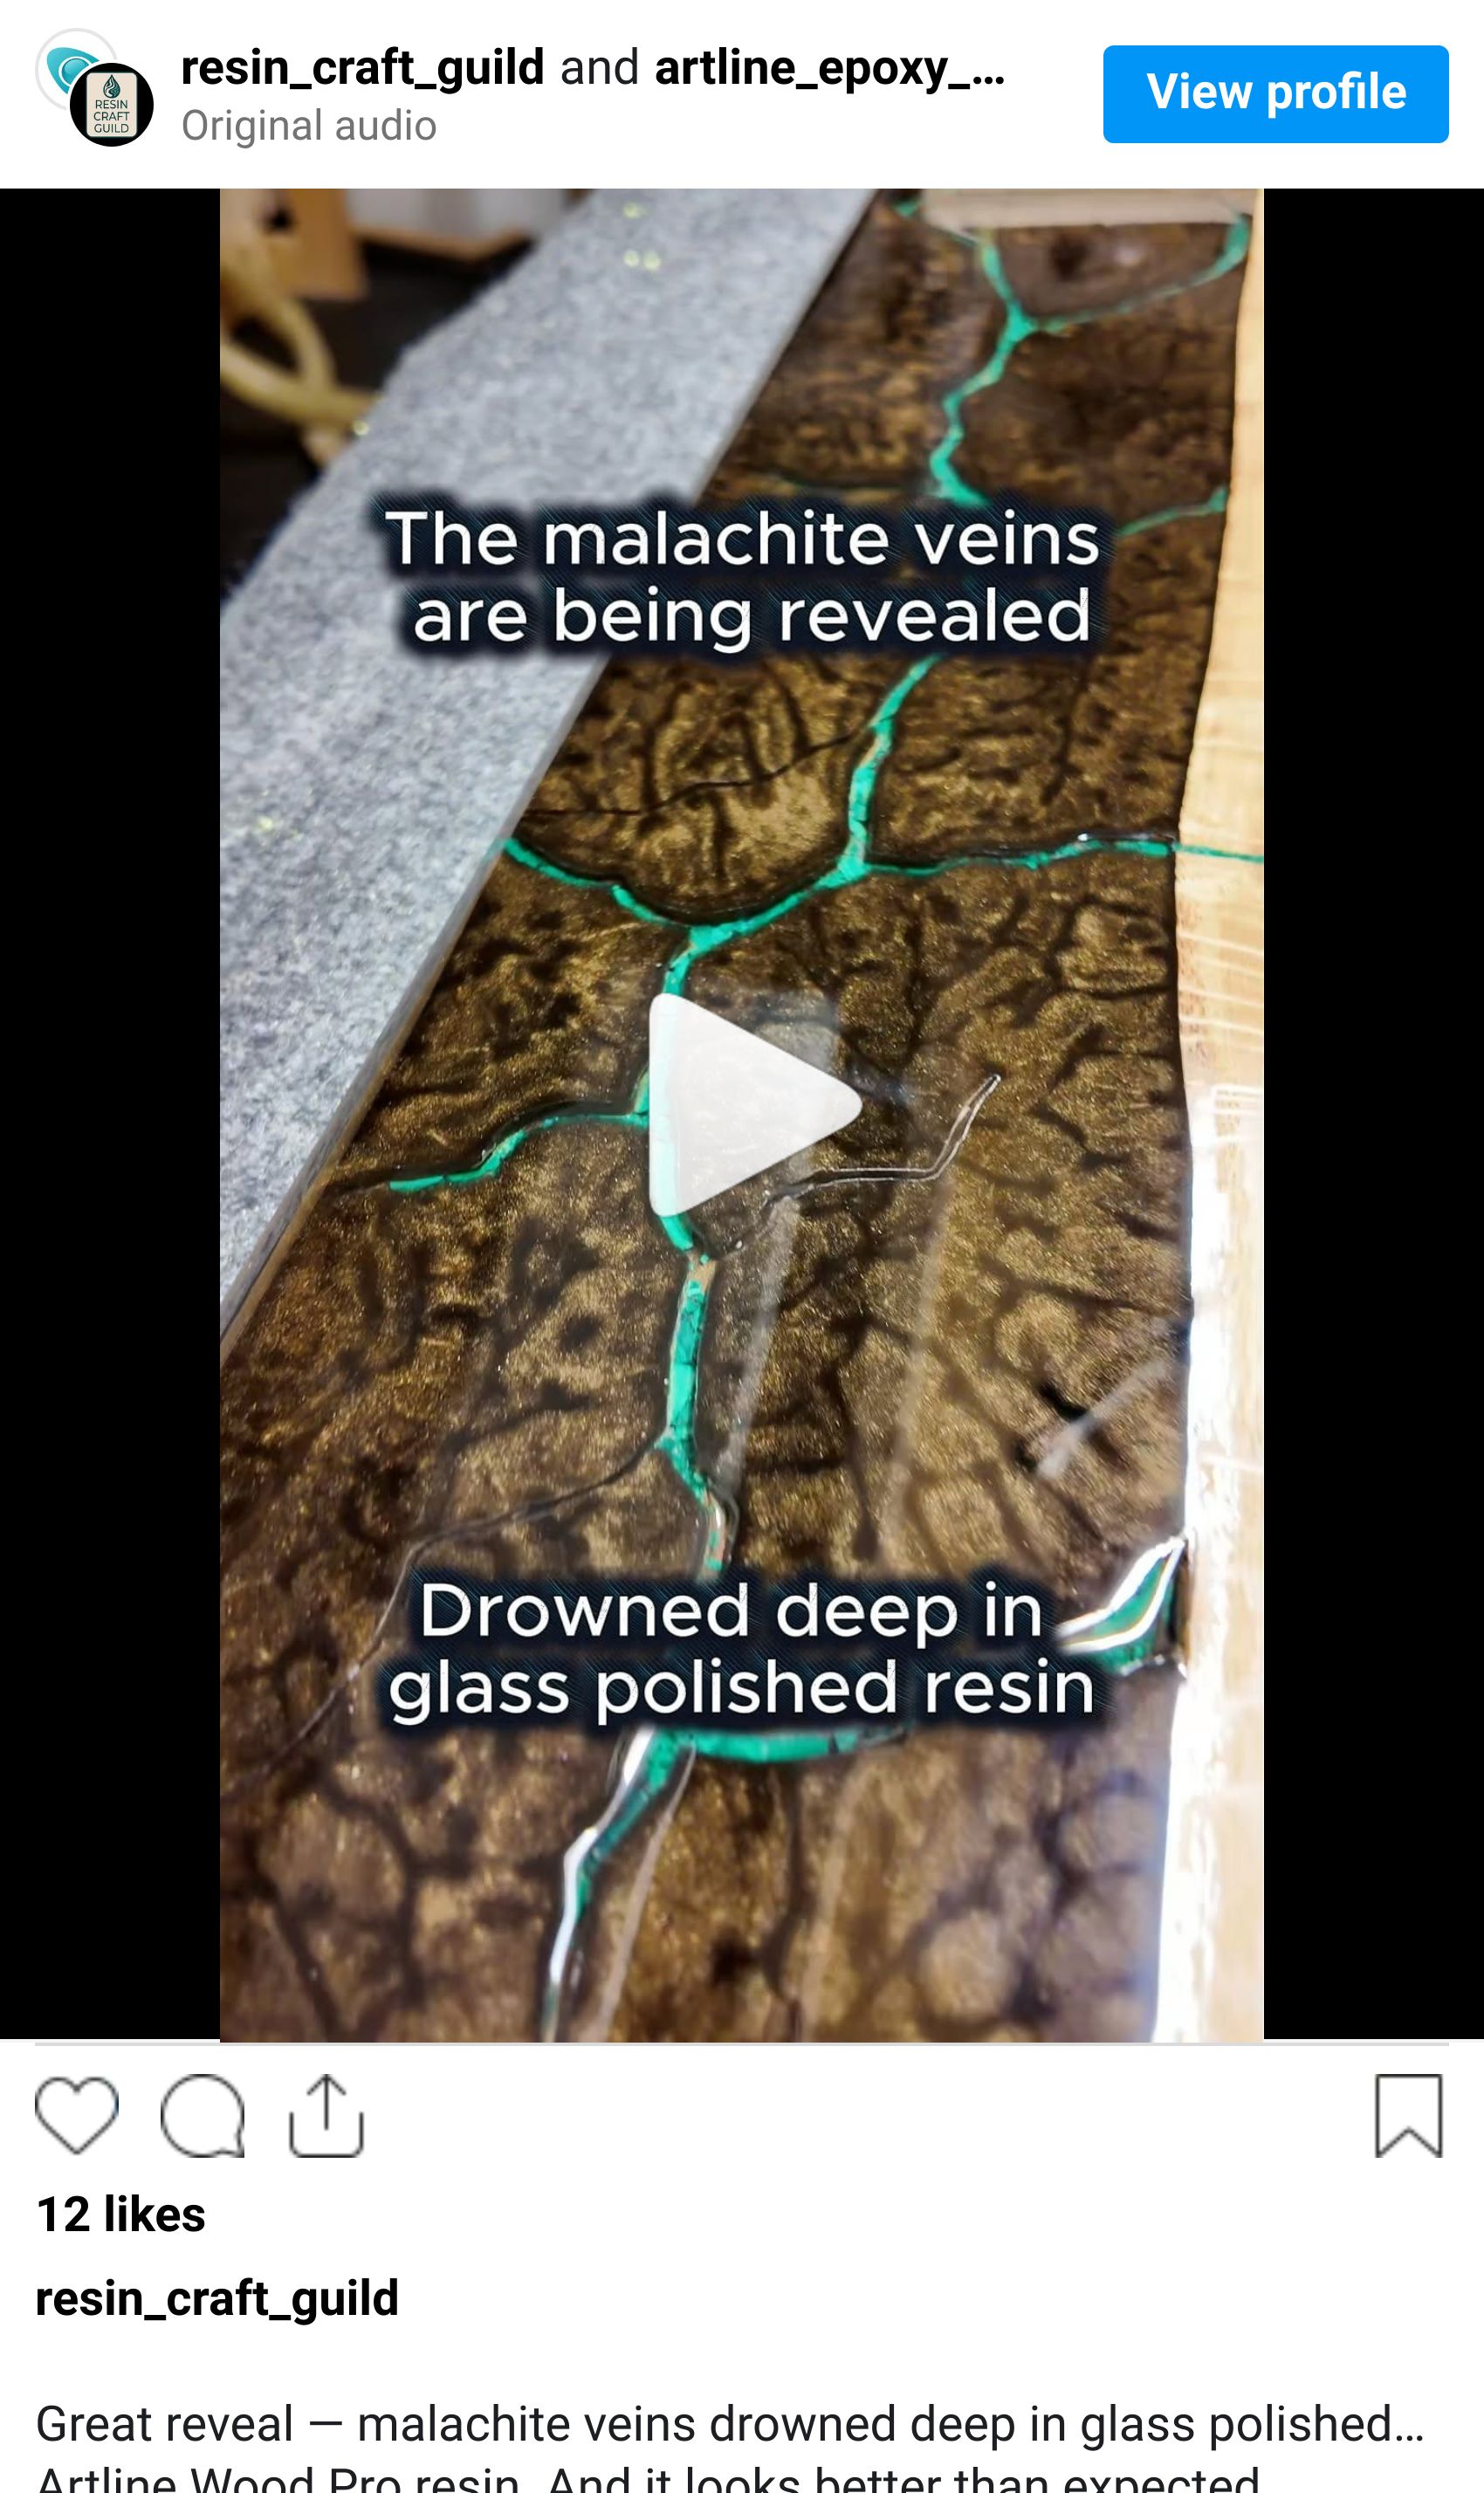
Once clean, go back in with the Dremel. Use it to shape the channel walls and bottom - removing any remaining clay residue and any epoxy that seeped under the walls during the second pour. At a few spots the epoxy will have crept in and partially covered the malachite stones. Route that away carefully so the stones are well visible from the surface. This is what makes the finished vein read as real stone rather than a smear of colour at the bottom of a channel. See how a cleaned channel looks on Instagram.
❝ My take: I was considering leaving the channels open - the exposed stone has its own raw appeal. But filling with transparent resin was the better decision for two reasons: dust accumulates in open channels over time and is impossible to clean out properly, and the resin adds a depth and clarity to the stone that you simply don't get when it sits exposed. The malachite looks like it's under glass. That's the effect worth working for.
9. Filling the Channels with Transparent Resin
The malachite
The malachite stones were placed and fixed into channels routed into the base layer before the clay walls were built. Those stones are already locked in place at the channel base. What you're doing in this step is filling the air space above them with transparent resin - locking them in clarity and bringing the channel surface level with the panel.
The transparent fill
Mix a batch of Artline Crystal Resin - no colorant. The transparency is the point. Crystal Resin's low viscosity flows cleanly into narrow channels without trapping air. Mix at 2:1 by weight. Pot life is 60 minutes, so work methodically without rushing.
If you have a vacuum chamber, put the mixed batch in for 10 minutes before pouring - it removes all air from the resin and is the most effective way to guarantee a bubble-free fill. If you do not have one, pour slowly and rely on the torch for surface bubbles.
Pour slowly into the open channels from one end, working along each channel in sequence. The channels are approximately 1cm deep. The resin will self-level within each channel.
After pouring, use a small torch over the surface to deal with any bubbles that appear. Keep it moving and don't linger. The result with vacuum degassing plus torch: no single microbubble in the finished pour.
Allow to cure fully.
❝ My take: Using real malachite stone is what makes this worth doing. Green pigment paste gives you green. Real malachite gives you the natural banding - pale green, mid-green, near-black - in every individual particle. That variation cannot be replicated with any colorant. The result reads as something geological, not something crafted. That difference is immediately visible to anyone who looks at the piece up close.
10. Processing: Releasing and Flattening
Releasing the panel
The oak board and epoxy panel are naturally joined - the resin was cast directly against the wood as part of the build. Once all epoxy is fully cured, peel the PE sheet base away from the bottom face. Work from one corner and peel steadily. Remove the aluminum tape walls. Watch the release on Instagram.
Clean the bottom face with a cloth.
Flattening
The two sections are flattened differently. The epoxy panel is flattened first using a router sled - set it up spanning the full width of the epoxy section, take light passes until the surface is flat, and check with a straightedge as you go. The transparent channel fills may sit slightly proud and need flattening along with the ground surface.
The oak section with the malachite inlay is not routed - as covered in Part 1, routing over cured malachite destroys bits immediately. The oak was pre-flattened before the inlay was set, so it only needs sanding to bring the proud stone flush with the wood surface. Start at 80 grit and work down.
Cutting and beveling
Cut to final dimensions. Bevel the edges - a small 45-degree bevel removes the sharp cast edge and gives the panel a finished look.
11. Sanding and Polishing the Epoxy Panel
⚠️ Wear a protective mask rated P2/FFP2 or higher throughout all sanding steps. Malachite contains copper compounds - the fine dust produced during sanding is toxic. Don't skip this.
Use epoxy-compatible sandpapers throughout this sequence - standard wood sandpapers clog immediately on cured epoxy. The right papers and full sanding sequence are covered in the RCG epoxy processing guide. Watch the final sanding and polishing on Instagram.
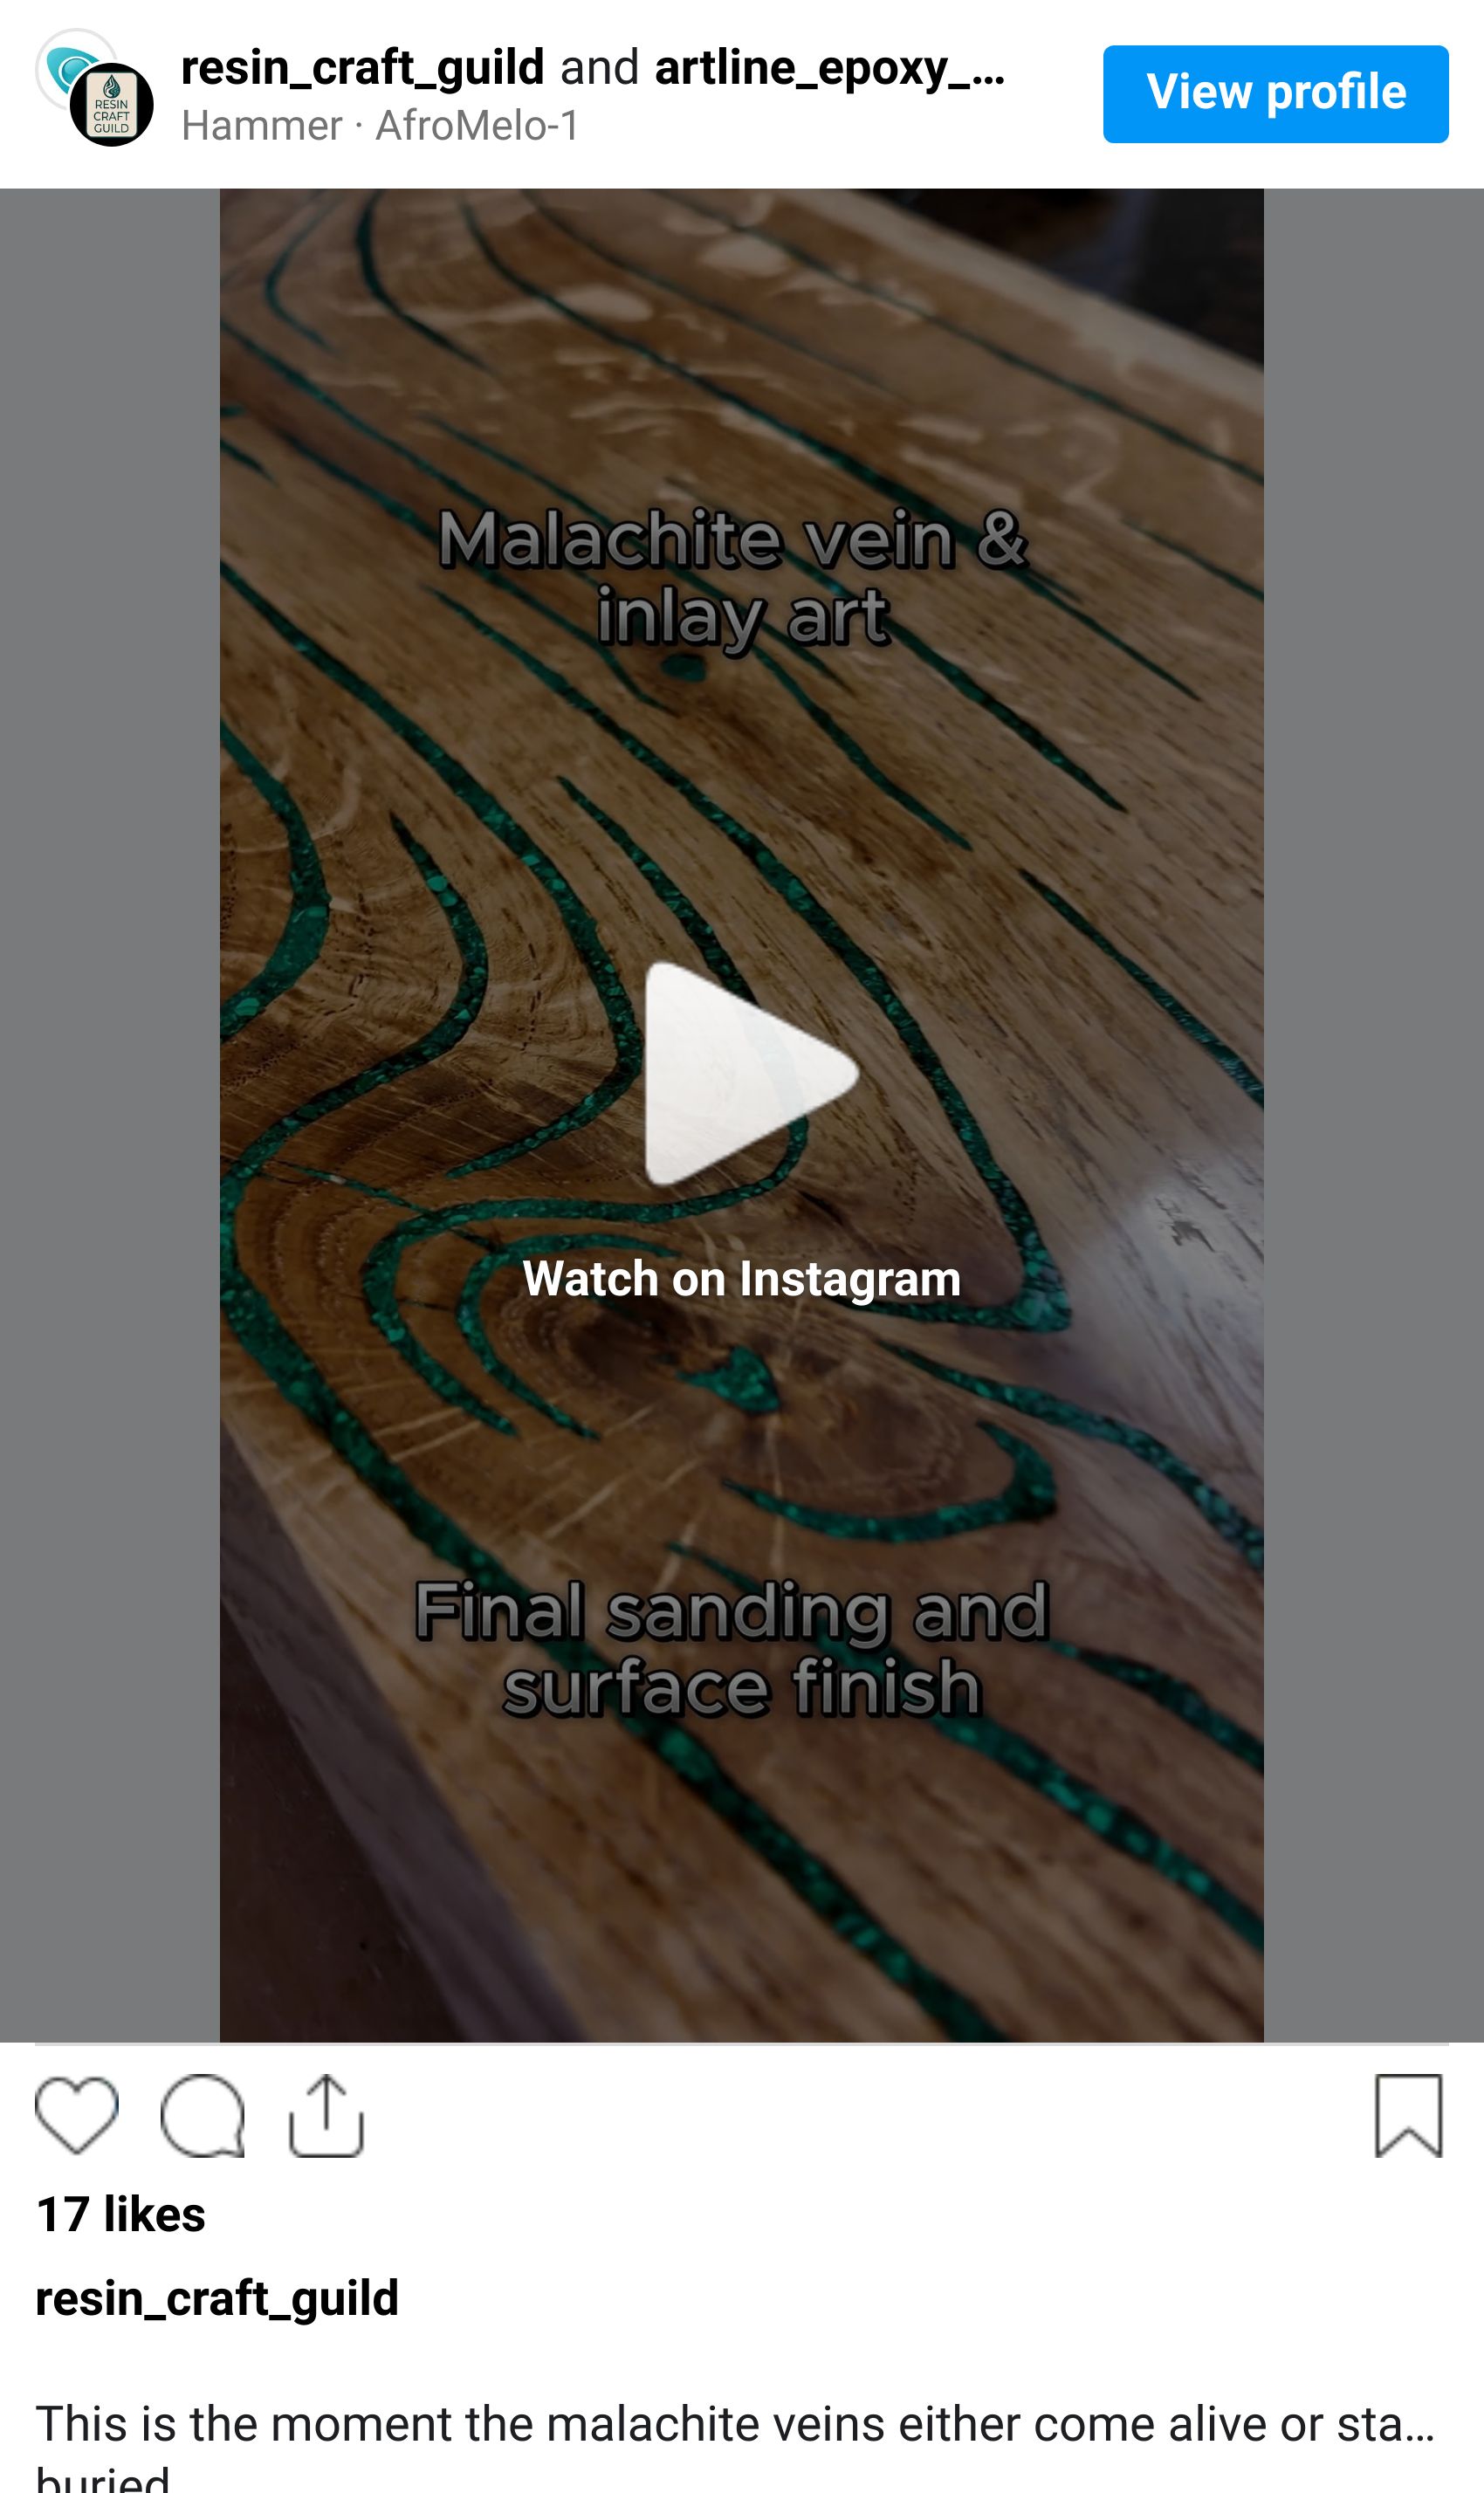
Start at 120 grit to remove router marks. Progress through 180, 240, 320, 400, 600, 800, 1000, 1500, 2000, 3000. Between every grit, wipe the surface clean. The bronze ground will develop its texture and depth progressively through the grits - the mica movement patterns become clearer as the surface smooths. The transparent channel fills will clarify with each grit, and the malachite stones will sharpen visually.
After 3000 grit, apply polishing paste with a polishing machine. The finished panel should have a clear, deep surface - the malachite veins reading as if embedded far below the surface level. Watch the veins revealed after polishing on Instagram.
Do not apply any oil or wood finish to the epoxy panel. The polished epoxy is the finish.
12. Reality Check
This build has more waiting than working. Multiple epoxy pours, each needing full cure time, clay walls to build and remove, channels to shape and clean, and a full sanding sequence from 120 to 3000 grit. In my case it took 3 weeks from start to finished piece - mostly waiting for cures between steps, not active work time. But it means this is not a weekend project.
The clay removal and channel cleaning step is the one that surprises people. It is not difficult - it is tedious. Budget the time for it. Rushing damages the channel walls.
The surface texture of the bronze ground - the organic, almost scaled pattern visible in the photos - is not something you create deliberately. It develops during the cure from mica particle movement. Your role is to pour cleanly and leave it alone. Touching or disturbing the surface during the gel phase disrupts the pattern. Pour, pass the heat gun once for bubbles, cover, and walk away.

Run a small test panel before committing to a full-size piece. The clay wall technique in particular benefits from a low-stakes rehearsal - the scale of the vein paths, wall height consistency, and silicone coverage all become clearer on a test before you work on the real piece.
The next project - a larger walnut coffee table - will take the inlay technique further with deeper inlays, but likely without the vein art panel. A different application of the same stone, different scale, different material.
Petr Resin Craft Guild www.resincraftguild.com
If this guide was useful, the newsletter covers this territory every week. Tested techniques, honest product reviews, real projects - three minutes, every week. 1,100+ makers already get it. → Subscribe at resincraftguild.com
This is Part 2 of the malachite series. Start with Part 1: Malachite Stone Inlay in Oak if you're building the combined piece.
The Epoxy Used in This Build
For this project I worked with Artline Resin - a European brand based in Slovenia. Natalie, the founder, agreed to supply the epoxy for the project and for its review. What follows is my honest feedback.
Wood Pro handled all the structural pour work - the brown base and second ground layers. 3:1 by weight, up to 5-6cm per layer, self-leveling. No issues at any stage.
Crystal Resin handled everything detail-critical - the malachite vein fills and inlay channels. 2:1 by weight, 60-minute pot life, maximum 2cm per pour. That fluid texture is exactly what you want filling tight channels without trapping air. For the vein fills I combined it with vacuum degassing and careful slow pouring. Not a single microbubble in the finished cast.
Honest observations from the build:
Mixing requires at least 20°C. Below that, trouble - not specific to Artline, but worth knowing before a winter workshop session.
Air release: very good. Bubbles find their way out without much encouragement.
Clarity: very good. The malachite green reads exactly as mixed, no cloudiness or hue shift in the cured piece.
Yellowing: too early for a final verdict, but a Crystal sample has been sitting in direct sun for some time and still looks clear. Promising.
Cutting and sanding: easy at every grit stage.
Being a European brand matters practically - no customs fees, no transatlantic shipping delays. Free EU shipping from €150. Orders come with two pigments included.
Artline Resin - use code ResinCraftGuild for 10% off your entire order.
Frequently Asked Questions About Malachite Vein Art Panel
What epoxy is best for the bronze ground in a malachite vein panel? For this build I used Artline Wood Pro for the ground layers (3:1 by weight, up to 5-6cm per layer) and Artline Crystal Resin for the transparent channel fill (2:1 by weight, max 2cm per pour, low viscosity). For the channel fill specifically, low viscosity matters more than brand - you need the resin to flow into narrow channels without trapping air.
Why coat the clay walls with silicone before the second pour? Two reasons. First, without silicone the clay surface partially bonds into the curing epoxy channel wall - when you remove the clay it tears rather than releasing cleanly, leaving fragments embedded in the wall. Second, there is a real risk that the resin partially dissolves the clay surface, causing cloudiness in the epoxy directly around the channel. The silicone creates a barrier against both - cleaner release and no contamination from the clay into the cured epoxy.
What type of clay works best for the wall technique? Basic air-dry modeling clay (play clay) works. It rolls easily into consistent ropes, adheres to the partially cured base layer without bonding permanently, and holds its shape under the second pour. The limitation is that clay removal is still tedious. A stiffer material that releases in one piece would be better - but nothing tested so far outperforms clay for the wall-building step itself.
How deep should the vein channels be? The channel depth equals the clay wall height. I chose approximately 10mm - deep enough to create a real vein or root feel with visual depth, but not so deep that the stones sit too far below the surface to read clearly. Shallower than that and the effect feels flat; deeper and you start losing visibility of the stone from above.
Why does the bronze ground have a textured surface pattern? The organic scaled or cracked-earth texture in the cured bronze ground forms naturally during the gel phase from mica particle movement. The exothermic reaction creates uneven heat distribution across the casting, which drives convection currents that move the mica. This is the Marangoni effect - the same physics that creates cell patterns in resin art. It is not engineered. Leave the surface undisturbed during the gel phase and let it develop.
Can the transparent channel fill be tinted? Technically yes - a very light tint of green would deepen the color of the malachite veins. In practice, the natural green of the malachite stone is strong enough that additional tinting is not needed. Fully transparent fill lets the stone color and banding show cleanly. Adding green tint risks overwhelming the natural stone variation that makes real malachite worth using.
How do I avoid air pockets in the transparent channel fill? If you have a vacuum chamber, degas the mixed resin for 10 minutes before pouring. Pour slowly from one end of each channel. After pouring, run a small torch over the surface for any remaining bubbles. With vacuum degassing plus torch the result was flawless - no single microbubble in the finished pour. Without a chamber, slow pouring and the torch alone will get you most of the way there.
Do I need to degas the transparent fill before pouring into the channels? For small-volume channel fills, vacuum degassing the mixed resin before pouring significantly reduces the risk of micro-bubbles in the finished piece. It's not always practical for small batches, but if you have a vacuum chamber available, use it. The RCG bubble removal guide covers degassing in detail.
Part 1: Malachite Stone Inlay in Oak - Complete Epoxy Guide (2026 Edition) - The oak inlay technique, grain-following channels, and flush stone finish
Artline Resin - Crystal Resin and Wood Pro used in this build. European brand, ships EU free from €150. Code ResinCraftGuild for 10% off.
Epoxy Casting for Beginners: Complete Preparation Guide (2026 Edition) - Mold setup, pour depth limits, mixing technique - the foundation this guide builds on
How to Remove Bubbles in Epoxy Casting (2026 Guide) - Degassing and bubble removal for the transparent channel fill
How to Color Epoxy Resin: Complete Pigments & Dyes Guide (2026 Edition) - Mica powder loading, ground color mixing, and the Marangoni effect explained
© 2026 Resin Craft Guild | www.resincraftguild.com
Affiliate disclosure: Some links in this guide are affiliate links. If you purchase through them, I may earn a small commission at no extra cost to you. I only recommend products I've personally tested and trust.
P.S. Never thought making inlays could be so deadly... in this direction.